BIM for Small Residential Projects: When Is the Modelling Worth It?
BIM is worth the modelling effort on a small residential project when the same maintained model helps you resolve a difficult design question or produce several outputs that would otherwise need separate updates. For a straightforward job with a few stable drawings, a well-managed 2D workflow may take less work. Choose the model's job before choosing its detail.
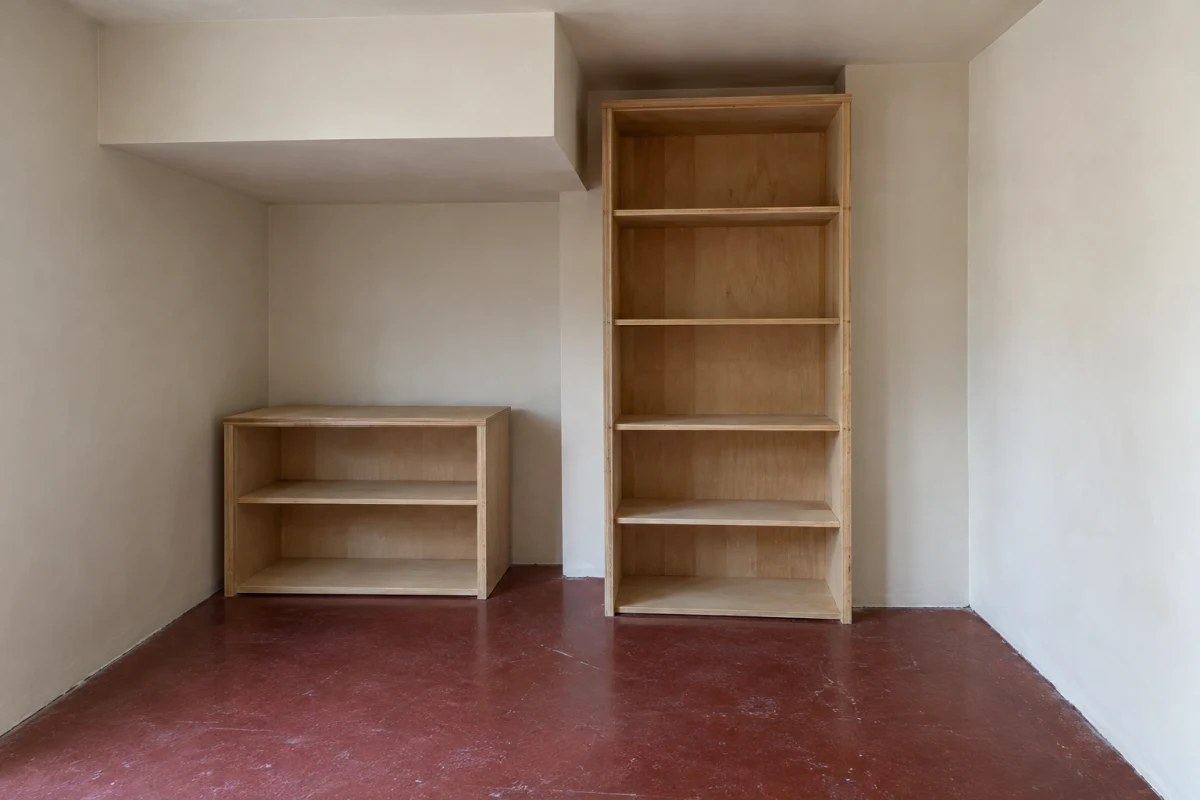
Illustrative resolved arrangement: shorter storage sits beneath the lower ceiling; tall storage stays in the higher part of the alcove. The drawings below show how to test that choice.
For a solo architect or designer, floor area is a poor shortcut for this decision. A small apartment can have awkward ceiling heights, tight service routes and several rounds of layout changes. A larger, familiar project may involve less uncertainty. What matters is the work the model will do and the effort needed to keep it trustworthy.
Find the work you are repeating
Building information modelling combines model geometry with information about the building and a process for keeping that information usable. A 3D picture alone does not establish a coordinated BIM workflow. On a small commission, start with a narrow, practical question: which decisions and documents will use the same information?
Look at a recent job. Where did you redraw the same change, reconcile conflicting views or rebuild geometry for a presentation? Where did a client need another view before making a decision? Those are possible uses for a maintained model. Count the checking that remains as well as the drawing that might disappear.
A model has a stronger case when you will reuse its geometry for layout decisions, different views and drawings through several revisions. The case is weaker when you need one uncomplicated plan, the design is settled and nobody will use the extra information. Your appointment and required deliverables still come first; an agreed model handover can change the decision even on a small job.
Model the difficult relationship first
Consider an illustrative apartment refit. The client wants tall storage beside a utility area. Its footprint fits on the plan, but an existing boxed-down ceiling covers part of the proposed location. The lower ceiling leaves less height for the cabinet. What the boxing contains, and what access the services require, have not yet been confirmed.
First separate what you measured from what you assumed. Record the underside of the box, its extent and the clear height beside it. Mark uncertain information in your project notes. An accurately drawn box with unknown contents remains an unknown condition.
1. Check the footprint in plan
A plan looks down at the layout. In this example, both proposed cupboards occupy available floor space along the rear wall. The dashed outline shows the box above the left unit. That outline tells you where the ceiling changes, but this footprint view does not tell you whether a tall cupboard fits below it.
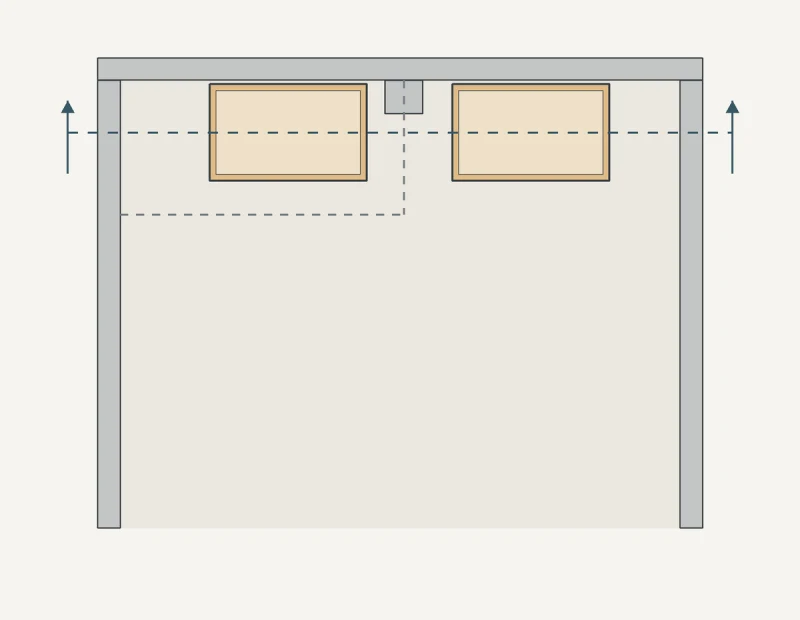
Illustrative plan of the initial proposal. The dashed rectangle marks the ceiling box above; the dashed line with arrows marks the cut used for the next view, looking towards the rear wall. The room's front boundary is omitted.
2. Test the height in section
A section shows a vertical cut through the same area. Here, each proposed cupboard is 2.5 metres high. The underside of the left ceiling box is 2.1 metres above the floor, so the left cupboard overlaps it by 0.4 metres. The right cupboard is below the 2.7-metre ceiling. These are invented dimensions for the study, not recommended sizes or measurements of the cover image.
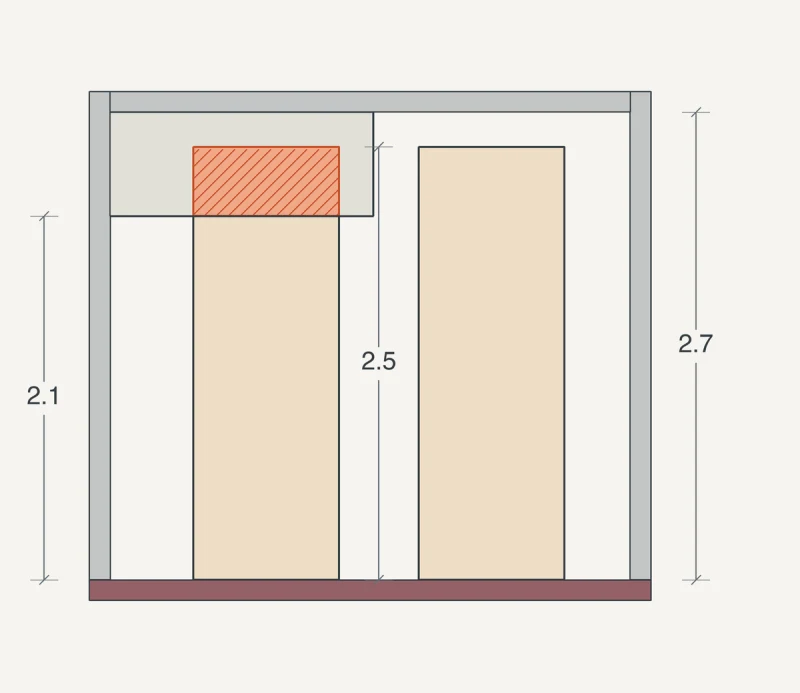
Illustrative section of the initial proposal; all numbers are heights in metres above the floor. Orange hatching is the volume claimed by both the cupboard and the ceiling box. It is a conflict, not a proposed construction detail. The view checks outer sizes, not installation or service clearances.
The section already reveals the problem. You do not need BIM to discover this particular conflict. A measured plan and section may be sufficient if this is the only decision and the drawings will see few changes.
Possible responses include a shorter cabinet beneath the box, moving taller storage into the higher part of the room, or investigating whether the boxing and services can change. The shorter option reduces storage height. Moving the unit uses wall space elsewhere and may affect access or the room layout. Changing services adds design and installation work and needs confirmation from the relevant specialists.
3. Revise the model and check the related views
The next view shows one response: reduce the left cupboard to 1.0 metre high, keeping its footprint and the right cupboard unchanged. A digital 3D study makes the two storage heights and the extent of the ceiling box easier to discuss together. Model the room boundary, the box and the outer size of the joinery. There is no need to model every shelf fitting for this decision.
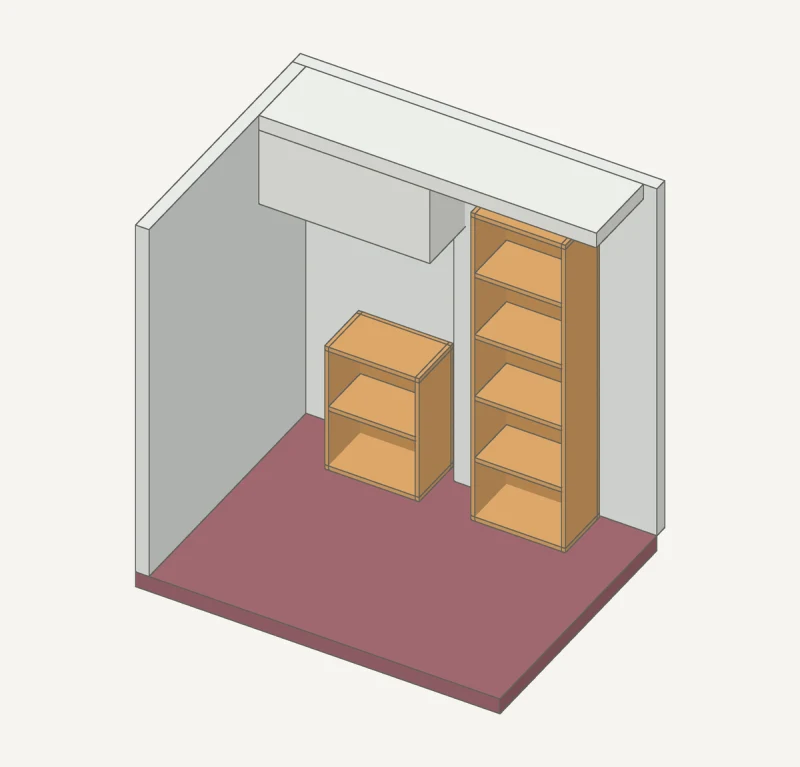
Illustrative digital 3D study of the revised proposal, authored from the same geometry as the plan and section. The left cupboard is now 1.0 metre high; the right stays at 2.5 metres. Front and right walls and the front ceiling are omitted to expose the relationship. This is a geometry illustration, not a Dravit screenshot.
Now follow the change into your outputs. The plan footprint can remain identical even though the cupboard height has changed. The section must show the lower top, and the 3D view must show the shorter unit. Check any drawing or joinery note that states its height. In a 2D workflow, update the affected separate drawings. With views derived from a model, change the controlling object, then verify the resulting views and sheets rather than assuming every output has followed.
That repeated use is the model's possible advantage: comparing options, discussing them with the client and maintaining related views through revisions. Count that work when deciding whether the model earns its upkeep.
A useful model makes that choice easier to discuss. It cannot confirm concealed services, required access, fixing details or whether an alteration is safe. Check those separately before treating the arrangement as ready to build.
Choose how much of the job belongs in the model
There are three reasonable ways to organise this work:
Keep the job mainly in 2D. Suitable when the required drawings are limited and the spatial questions can be resolved clearly in plan and section. You retain responsibility for keeping separate views consistent, but avoid setting up a model that has little further use.
Use a focused model with 2D details. Model the relationships that affect decisions and repeated outputs; draw specific details separately where that is clearer. Record which source controls each item. Otherwise a change in a detail can quietly diverge from the model.
Maintain a broader model through the project. This can make sense when many views, repeated elements or agreed information exchanges depend on it. It also creates more objects and data to check and maintain. Set the required information and update responsibility before expanding it.
These are choices about scope, not grades of professional quality. Each can produce useful work when it meets the project's requirements. Extra detail is useful only when someone needs it for a decision or deliverable.
In Dravit, you can inspect the same building model in Top 2D and 3D and prepare floor-plan drawing sheets in a browser workspace. That supports a defined model scope with related views and output. The distinction between the model and its drawings matters here: a saved model is not an issued drawing, and sheets still need checking after changes. The apartment study above illustrates a design question, rather than a demonstrated Dravit model or a services check.
Compare extra hours with work avoided
Compare the two methods for the same scope and quality of work. Count only the differences: extra setup, learning, modelling and upkeep on one side; repeated drawing and checking avoided on the other. Work that both methods require should not be counted as a model saving.
For example, suppose a fictional commission needs six extra hours to set up and build the model, then two extra hours to maintain it. Suppose it avoids seven hours of separate drawing updates and reconciliation over the job. That is eight extra hours against seven avoided: one more hour of work overall. These are invented figures to show the calculation, not a BIM benchmark or measured Dravit saving.
The model may still be worthwhile if it answers an important question that the simpler workflow does not resolve as clearly. Record that benefit separately. An assumed site problem avoided is not a measured financial saving, and a clearer presentation is not automatically additional fee income.
Use your own time records to improve the next decision. Separate reusable setup from work repeated on every commission, and do not assume all training or model content will transfer. If you need a financial comparison, add your actual labour costs, software charges and other incremental expenses. A favourable hours comparison alone does not establish financial payback.
Set a boundary you can maintain
Before starting, write a short scope note:
The decisions and outputs the model will support.
The geometry and information needed for those jobs.
The existing conditions that remain unverified.
The details or documents maintained separately, and which source controls them.
The time allowed for setup and updates, with a review point before further detail is added.
Use that note to stop unnecessary modelling. If an object changes neither a decision nor a required output, leave it out unless a later task needs it. If new requirements make the model useful in another way, expand the scope deliberately.
For the apartment example, a model of the ceiling and joinery relationship may earn its place while detailed service design stays with the appropriate specialists. On another commission, a measured plan and section may be enough. The useful outcome is a clear choice about what to model, why it matters and what still needs checking.