How to Choose Architecture Software for a Small Practice
Choose architecture software by testing the work your practice must deliver: a usable drawing, a normal revision and a file another person can open. Start with those requirements, then compare the time, support and cost involved. A polished model is only one part of the result.

Illustrative studio: check the drawing output as well as the model on screen.
For a team of one to ten, the useful question is whether the tool fits your projects without creating more checking and administration than you can support. You can answer that with one small project test before changing the way the whole office works.
Start with the work you are paid to deliver
Imagine a three-person practice handling a house renovation. The client needs layout options, then an agreed set of drawings. A structural consultant needs information about the existing building and proposed openings. The practice is considering a new design tool because changes currently mean checking several separate files.
Before a trial, write down the outputs for that job. Which plans, elevations, sections and details will you prepare? Which need dimensions, notes or schedules? What must the consultant receive, and what does the client need to understand? The project, appointment and local requirements determine that list. A concept presentation and a technical drawing set have different jobs.
Separate requirements that can stop the purchase from preferences. An accepted file format, a necessary drawing type or access for the person producing the work may be essential. A preferred rendering style may be optional. Do not let an attractive feature compensate for a missing output you are contracted to provide.
Keep the list specific. “Can produce drawings” is too vague. “Can produce the plan at our chosen sheet size, with readable dimensions and the required project information” is something you can test.
If quantities or an early cost estimate are part of your service, test one item against an independent measurement, then make a change that should alter it. Check the quantity, units and stated exclusions; assess the price assumptions separately.
Run one project through a normal change
Use a copy of a small completed project, with permission to use its information, or a fictional equivalent. Pick a project with the elements you regularly design. A simple new house will not expose the same problems as an existing building with irregular walls and several floor levels.
Use the same starting information and required outputs for each trial. Record any help you receive and separate first-time setup from work you will repeat on every project.
Make the first usable output. Build enough of the project to produce one required plan and an elevation. Check units, dimensions, visibility and the chosen sheet size. Open the exported file and, if printing is part of your work, check a print at its intended size.
Change something ordinary. Move a window along its wall. Follow the change through the plan, elevation, relevant dimensions and any window list you use. Record which parts update, which need refreshing and which require manual editing. Check that the sheets actually sent out show the revised position.
Close and reopen the work. Confirm that the saved project and drawing settings are still usable. Find the current files without relying on the person who created them to explain the folder.
Hand the result to its next reader. Have a colleague or consultant open the file in the application they normally use and check the information they need. A client should be able to understand the agreed layout without becoming a software operator.
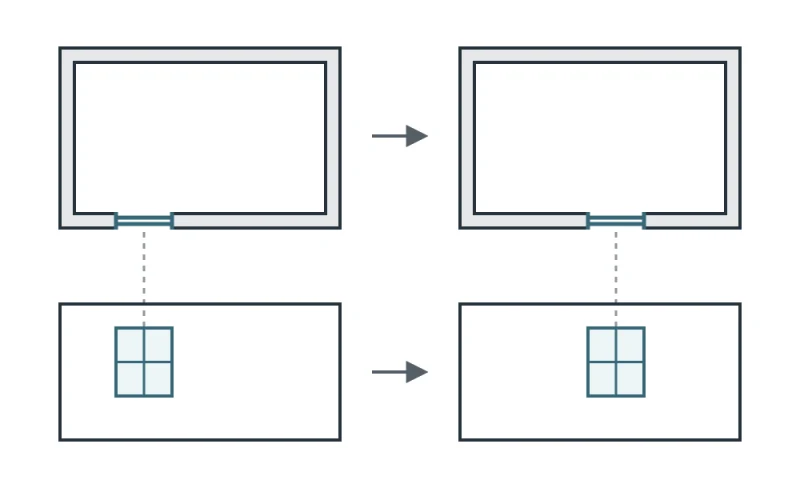
Illustrative drawing check: the original window is on the left; the revised window is on the right. Each plan sits above its matching elevation. Thin dashed lines align the window in each pair, and arrows show the change between versions. Other openings and construction details are omitted.
The point is to find where checking effort goes. A tool may create a convincing 3D view quickly but leave dimensions or drawing notes to be updated separately. Another may need more initial setup but make your regular changes easier to follow. Both can be useful if you understand the work that remains.
Dravit brings a building model, plan and 3D inspection, and configurable drawing sheets into a browser workspace. For a small practice, that gives you one place to test the model and its drawing output together. The guide to creating a plan sheet shows the sheet settings and preview checks. Use your own output requirements to judge the result; a model-derived sheet still needs the appropriate content and professional review before issue.
Test the exchange, not just the file extension
Ask the recipient what they need to do with the information. A PDF may be enough to review a proposal. Editable drawings, a coordination model or particular object information may be needed for a different task. A screenshot cannot replace those deliverables.
For every essential exchange, record the format and version, export settings, receiving application and intended use. Then check the actual file. Are the units and position correct? Are the necessary objects and properties present? Can the recipient perform the agreed task?
IFC, an open format for exchanging building-model information, is useful where that is the agreed exchange. It does not follow that everything visible in an imported model can be edited as it was in the original project. If continuing design in another application matters, test that separately from simply opening and viewing the file.
Include your own future access in this check. Find out what you can retain and reopen if a subscription ends, and whether you can keep the issued drawings and the information needed to revisit the project. Confirm the actual terms and available exports before committing.
Count setup, checking and support in the cost
A subscription price is only one line in the decision. Make separate lists for the effort to get started and the cost of continuing:
Getting started: templates, initial training, moving project information, setting up access and any equipment changes.
Continuing: the licences people actually need, storage or add-ons, support, repeat training and time spent checking or repairing outputs.
Use your own staff costs and expected project workload. Treat time as a practice cost even when you do not pay an extra invoice for it. Do not count a hoped-for reduction in work as a saving until the trial gives you a reason to expect it.
Test on the computers and connection your team will use. For a browser workspace, check the actual project's responsiveness and what happens when connectivity is interrupted. For any tool, find out who can resolve a problem when the person who knows it best is away.
Avoid making the trial depend entirely on one enthusiastic user. For a solo practice, reopen the work later without the trial notes beside you. For a team, ask a second person to find the project, make a small agreed edit and produce the next output using a short written procedure. That exposes training and handover gaps.
Record evidence before making the choice
You do not need a complicated scoring system. For each candidate, complete the same short record:
Required output: the actual sheet or file, with remaining content gaps.
Normal revision: what changed correctly and what needed manual work.
File use: what the recipient could use, and anything missing.
Daily use: setup effort, repeated steps and help required.
Cost and access: ongoing charges, training needs and exit conditions.
An unresolved essential requirement stays unresolved even if the rest of the trial went well. For the candidates that meet those requirements, compare recurring effort and cost. A trial is a useful sample, not proof that the tool will handle every future project.
You may decide to keep your current setup, introduce a model workspace for a defined part of the work, or replace the main design tool. Keeping the setup avoids immediate retraining but leaves its existing friction. Adding a tool can improve one task but creates a handover to manage. Replacing the main tool can simplify the workflow if the tested outputs fit, while requiring time to establish new habits and templates.
Choose a low-risk next project and a clear review point. Name the work the tool will cover, who will maintain its settings and which outputs still need another method. You then have a reasoned choice based on a project your practice recognises, rather than a feature list you hope will work later.