
An attic is a room under the roof. The Attic panel measures floor area and ceiling height for a Room. Its results table shows areas in m² and heights in your project's length unit. The Room's original boundary stays unchanged.
The analysis can propose knee walls along the low sides of the roof. Create N knee walls creates ordinary Walls that you can edit with the regular Wall controls. The Roof's separate Build knee walls checkbox generates Roof-owned perimeter walls below a raised roof and requires no Room analysis.
Prepare the Room and Roof
Create a closed Room at the attic floor elevation. The Roof can rise above that floor using its Offset, but the analysis candidate must be bound to the same Level as the Room. A Roof on a separate roof datum will not automatically appear as that Room's candidate. Adjust the bindings deliberately and check the underside elevation in a side view.
The Roof must resolve over the relevant room area. An invalid shape or an uncovered portion can prevent a complete analysis. Analysis uses the resolved interior surfaces, including dormer interiors and the depth of a resolved framing layout. Where framing exists, the interior reference lies below it rather than at the outer covering. Hiding Show framing changes only the display; it does not restore that depth or increase the calculated headroom.
Enable analysis from the Roof
- Select the Roof in Top and open Attic.
- Choose Room from the eligible Rooms on the Roof's Level. The selected Roof remains the analysis host and stays selected while you change these Room settings.
- Choose Height targets. Custom height targets lets you set Usable from height and Average height target. Poland attic targets supplies preset thresholds; open Details for the regulatory source.
- Set Knee wall height, the height above the Room floor at which you want candidate walls. It is a separate choice from the usable-area minimum and cannot exceed that minimum.
- Select Enable analysis, or Update analysis after changing an existing setup. Read the status and area metrics in the Roof panel. Select the Room in Top to inspect its shaded headroom zones.
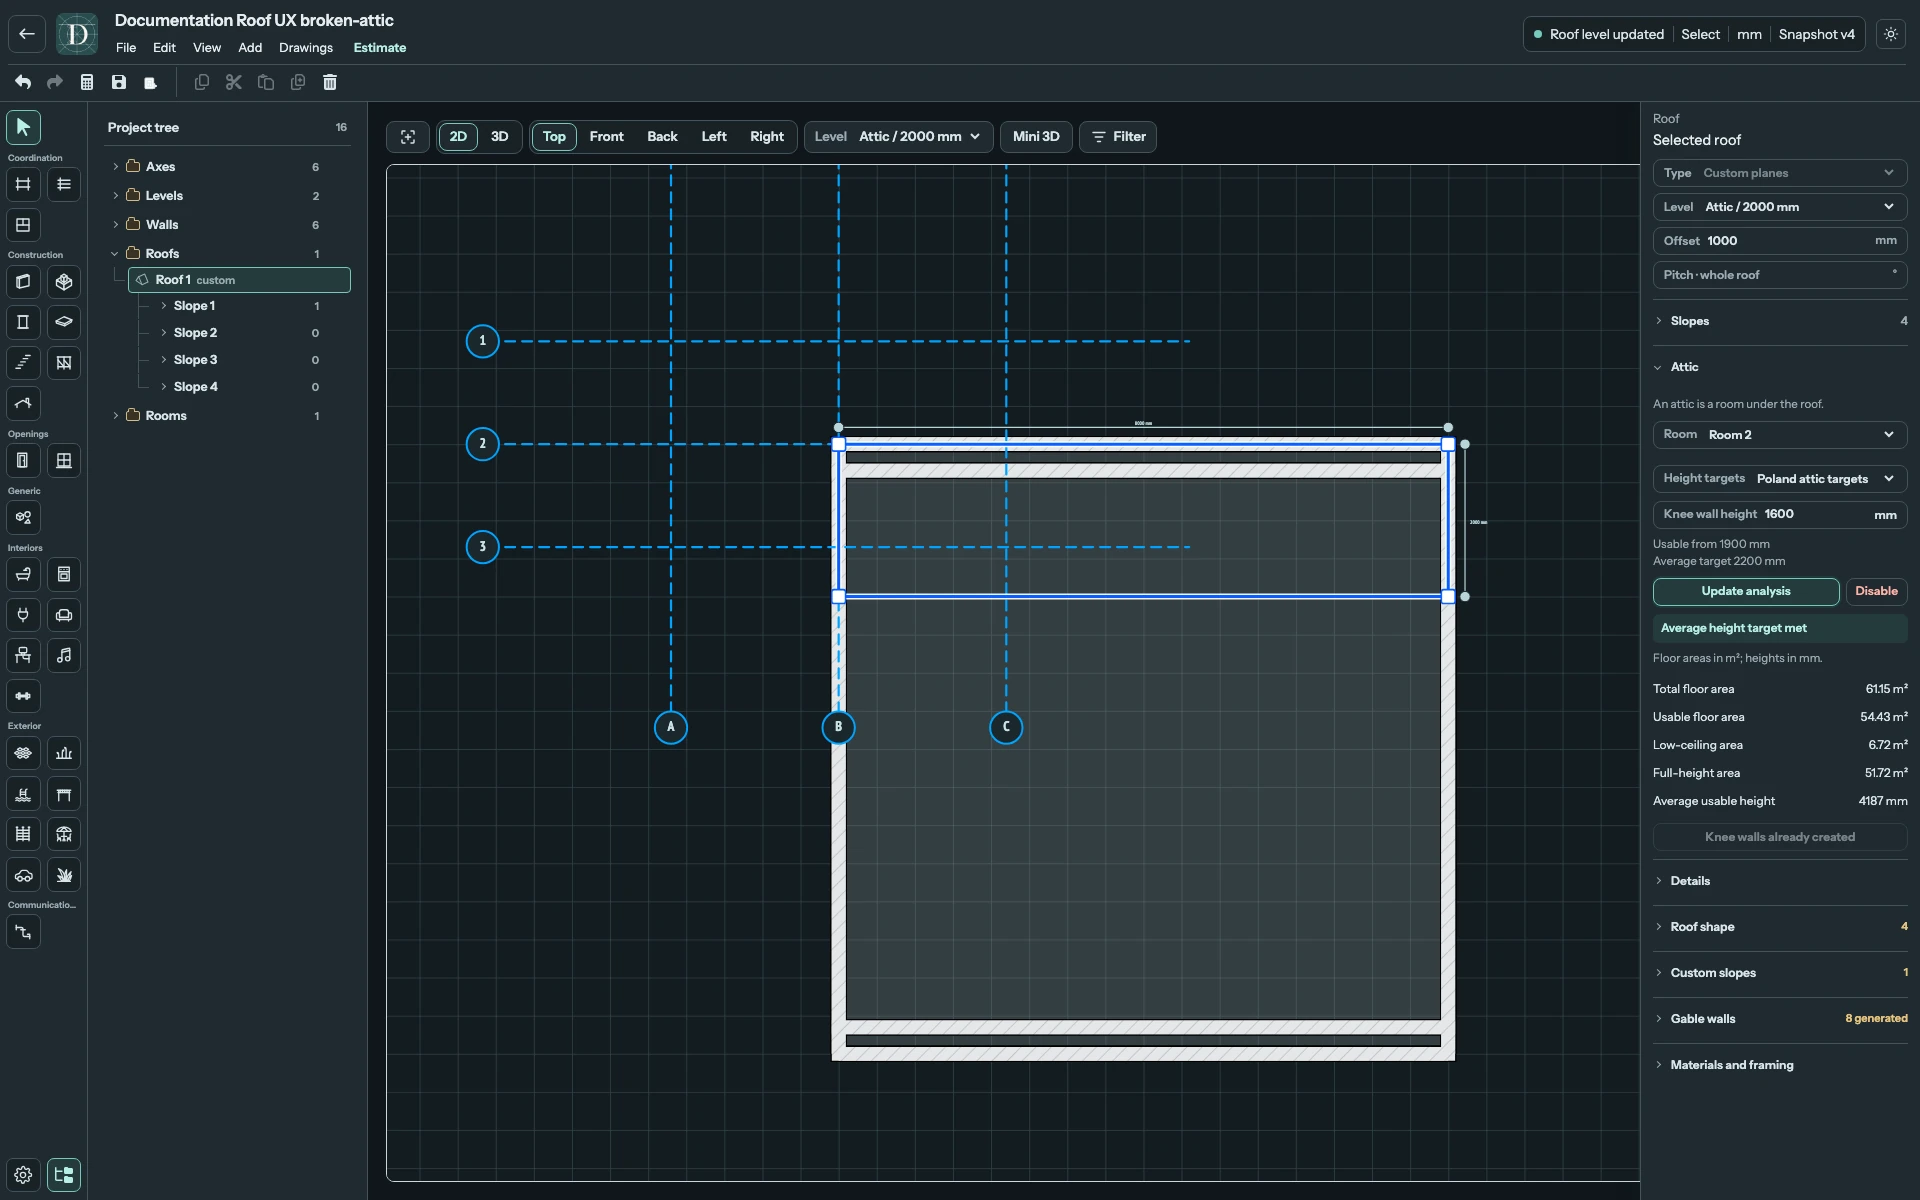
View the Roof's Attic controls at full size.
If no Room is offered, create or bind the Room to the same Level as this Roof and check that the Roof has valid geometry. Sharing a Level makes a Room eligible for selection; the Roof must still cover the area needed by the analysis.
Each Room has one attic-analysis setup. Enabling it against a different Roof changes that Room's host. Selecting a Room in the Roof's Attic section does not display another Roof's saved metrics as if they belonged to the current Roof. Check the host before enabling or updating the setup.
Use the same settings from the Room
Select the Room in Top, open Attic under Roof, and choose Roof underside from the eligible same-Level roofs. The Room selection displays the shaded headroom zones and candidate contours. The height targets, knee wall height, results table and wall commands are the same as in the Roof's Attic section. Use this entry point when you want to choose between several eligible roofs for one Room.
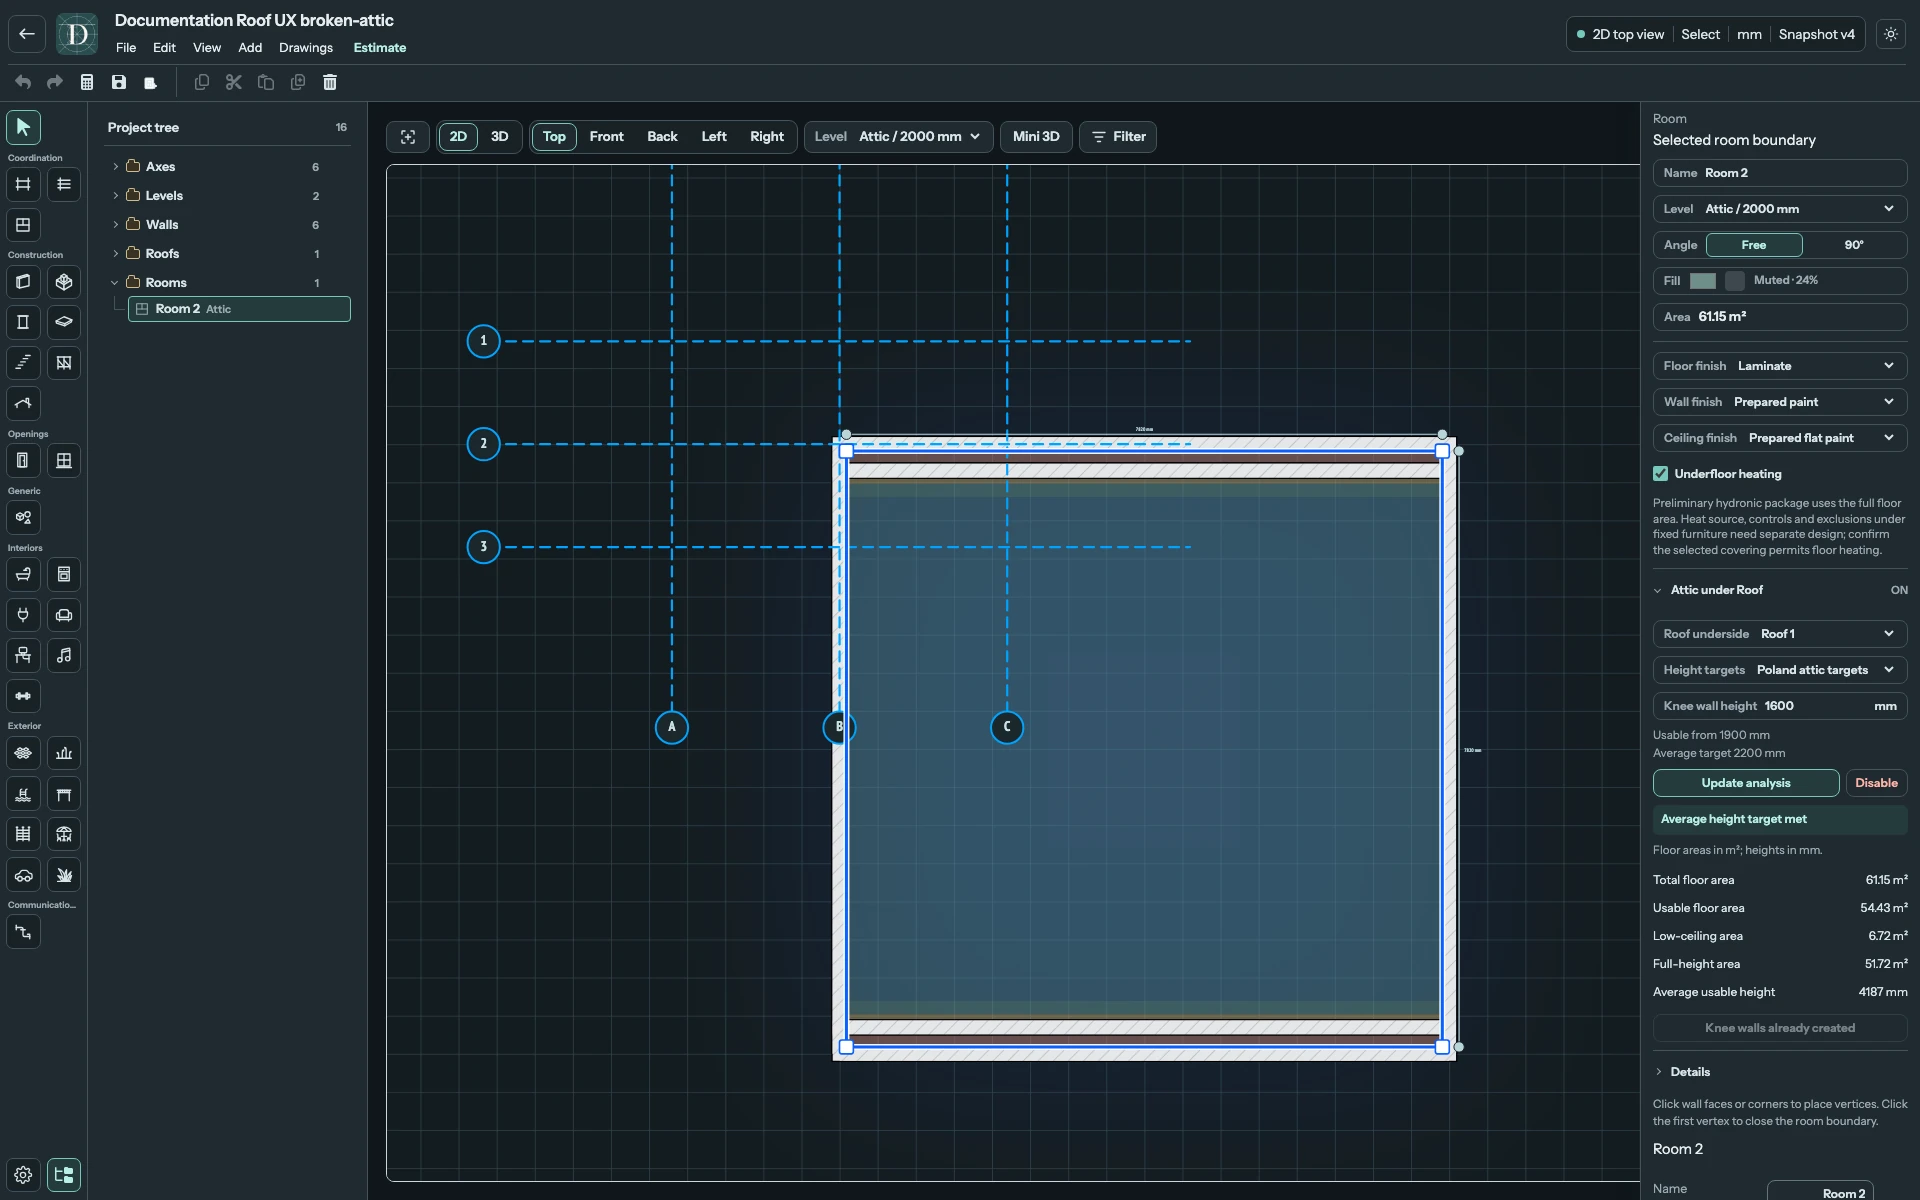
View the attic analysis at full size.
Both custom height targets must be positive, and Average height target must be at least Usable from height. Knee wall height is positive and cannot exceed the usable minimum. Enable analysis or Update analysis stays unavailable while those conditions are not met. When raising the usable minimum above the old average, raise the average target first.
Choose targets that apply to your intended review. Custom height targets is advisory; its status is Custom height estimate. Poland attic targets uses a specific preset. Average height target met means the average height over the usable area reaches its target. Average usable height is below target means it does not. This geometric check does not approve the whole project or supply a universal rule for other jurisdictions. Open Details for the preset's source and calculation context.
Read the results
| Result | Meaning |
|---|---|
| Total floor area | Area inside the Room's original floor boundary, in m². |
| Usable floor area | Floor area whose ceiling height meets the selected minimum, in m². |
| Low-ceiling area | Floor area below that minimum height, in m². |
| Full-height area | Floor area whose ceiling height reaches the selected average target, in m². It is part of the usable area. |
| Average usable height | Average height from the floor to the resolved interior reference over the usable area, in your project's length unit. |
The table has one result per row. Full-height area is included in Usable floor area, so adding them would count part of the floor twice. Knee wall height controls wall placement; it does not change the usable-area minimum. If the Roof or Room changes, inspect the recomputed zones and status again.
See what changing the minimum does
These two Top views show the same 57.15 m² Room under the same roof with its timber framing included in the interior reference. The first uses Usable from height 1900 mm and Average height target 2200 mm. The second uses 2300 mm and 2400 mm. After Update analysis, usable area decreases from 36.80 m² to 28.94 m²; total area remains 57.15 m². Choose targets for your own intended assessment rather than copying this example.
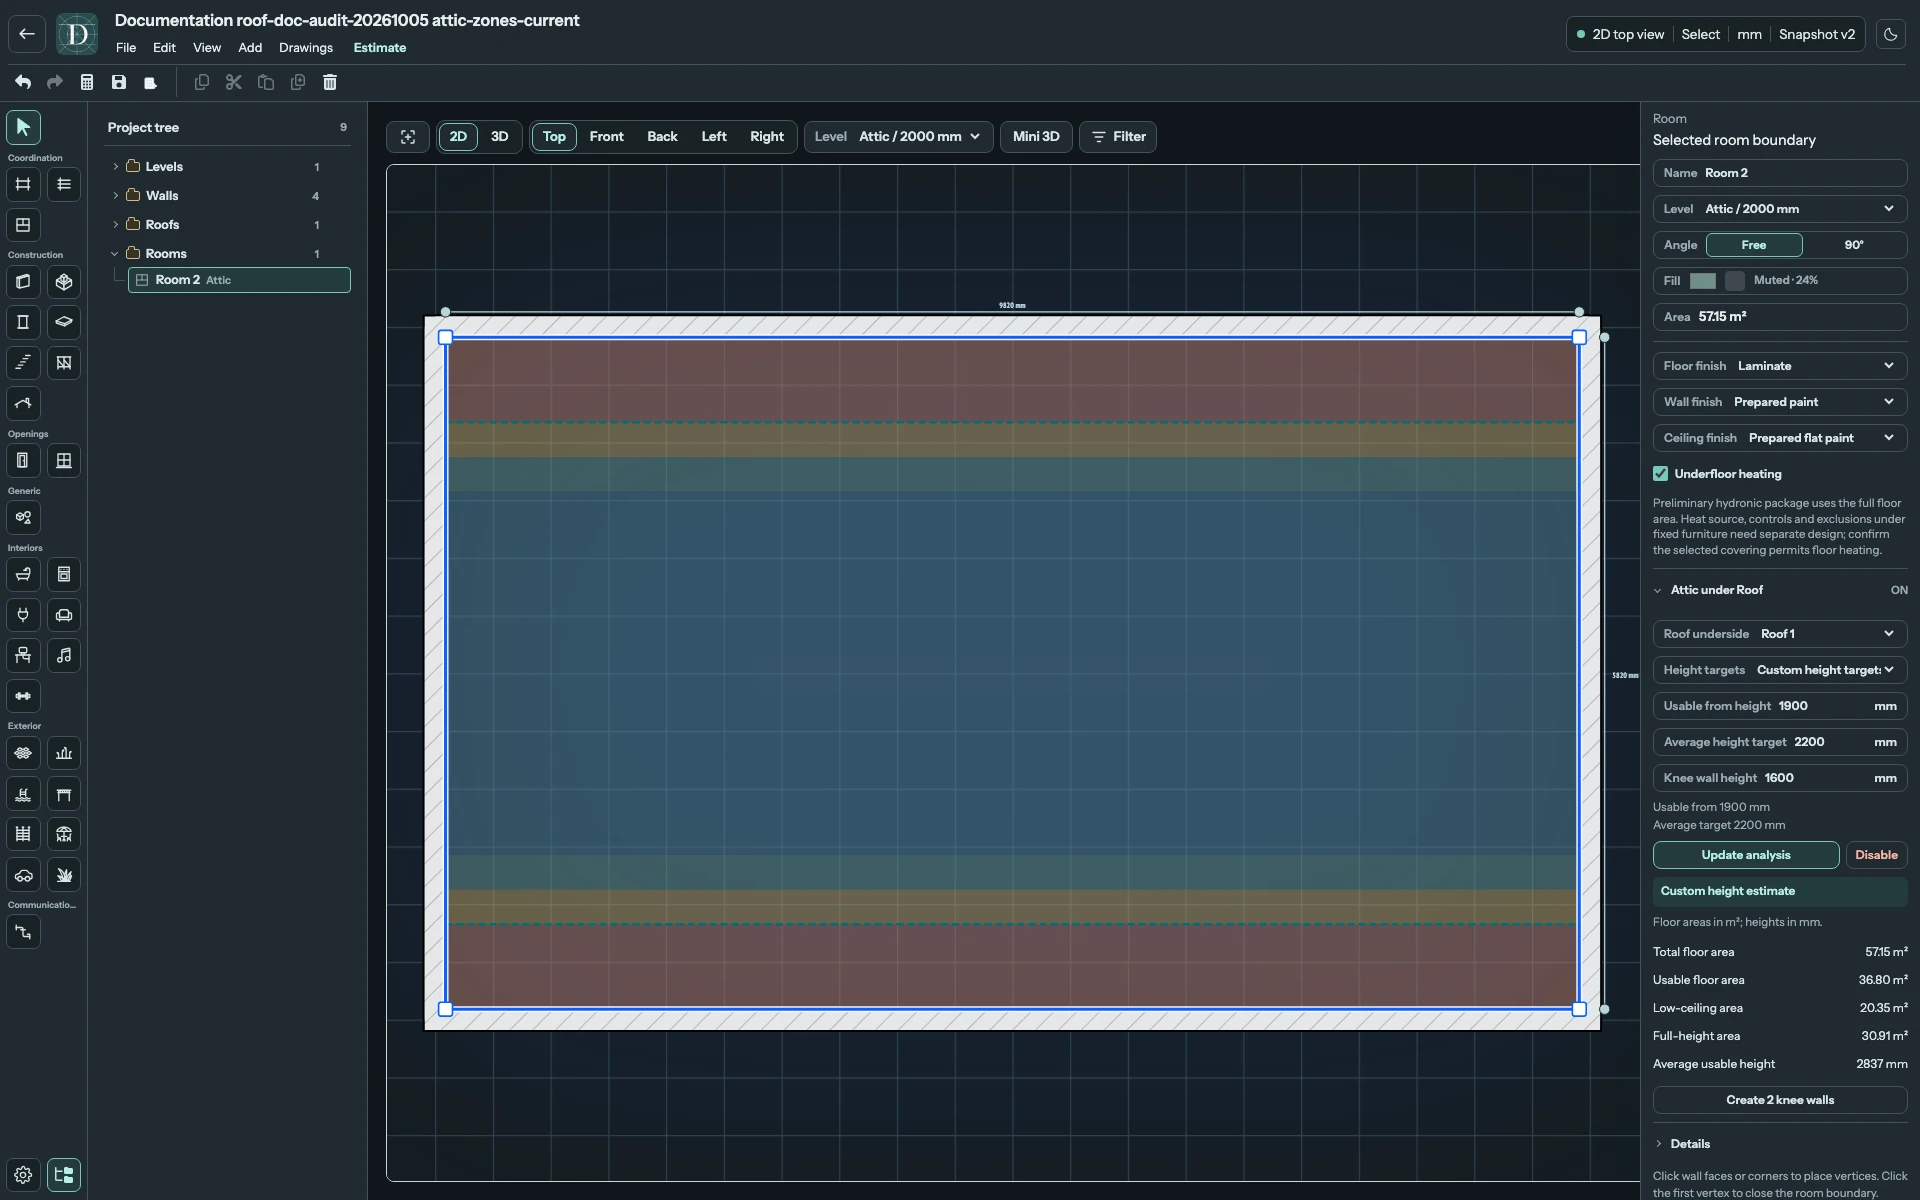
View the first headroom analysis at full size.
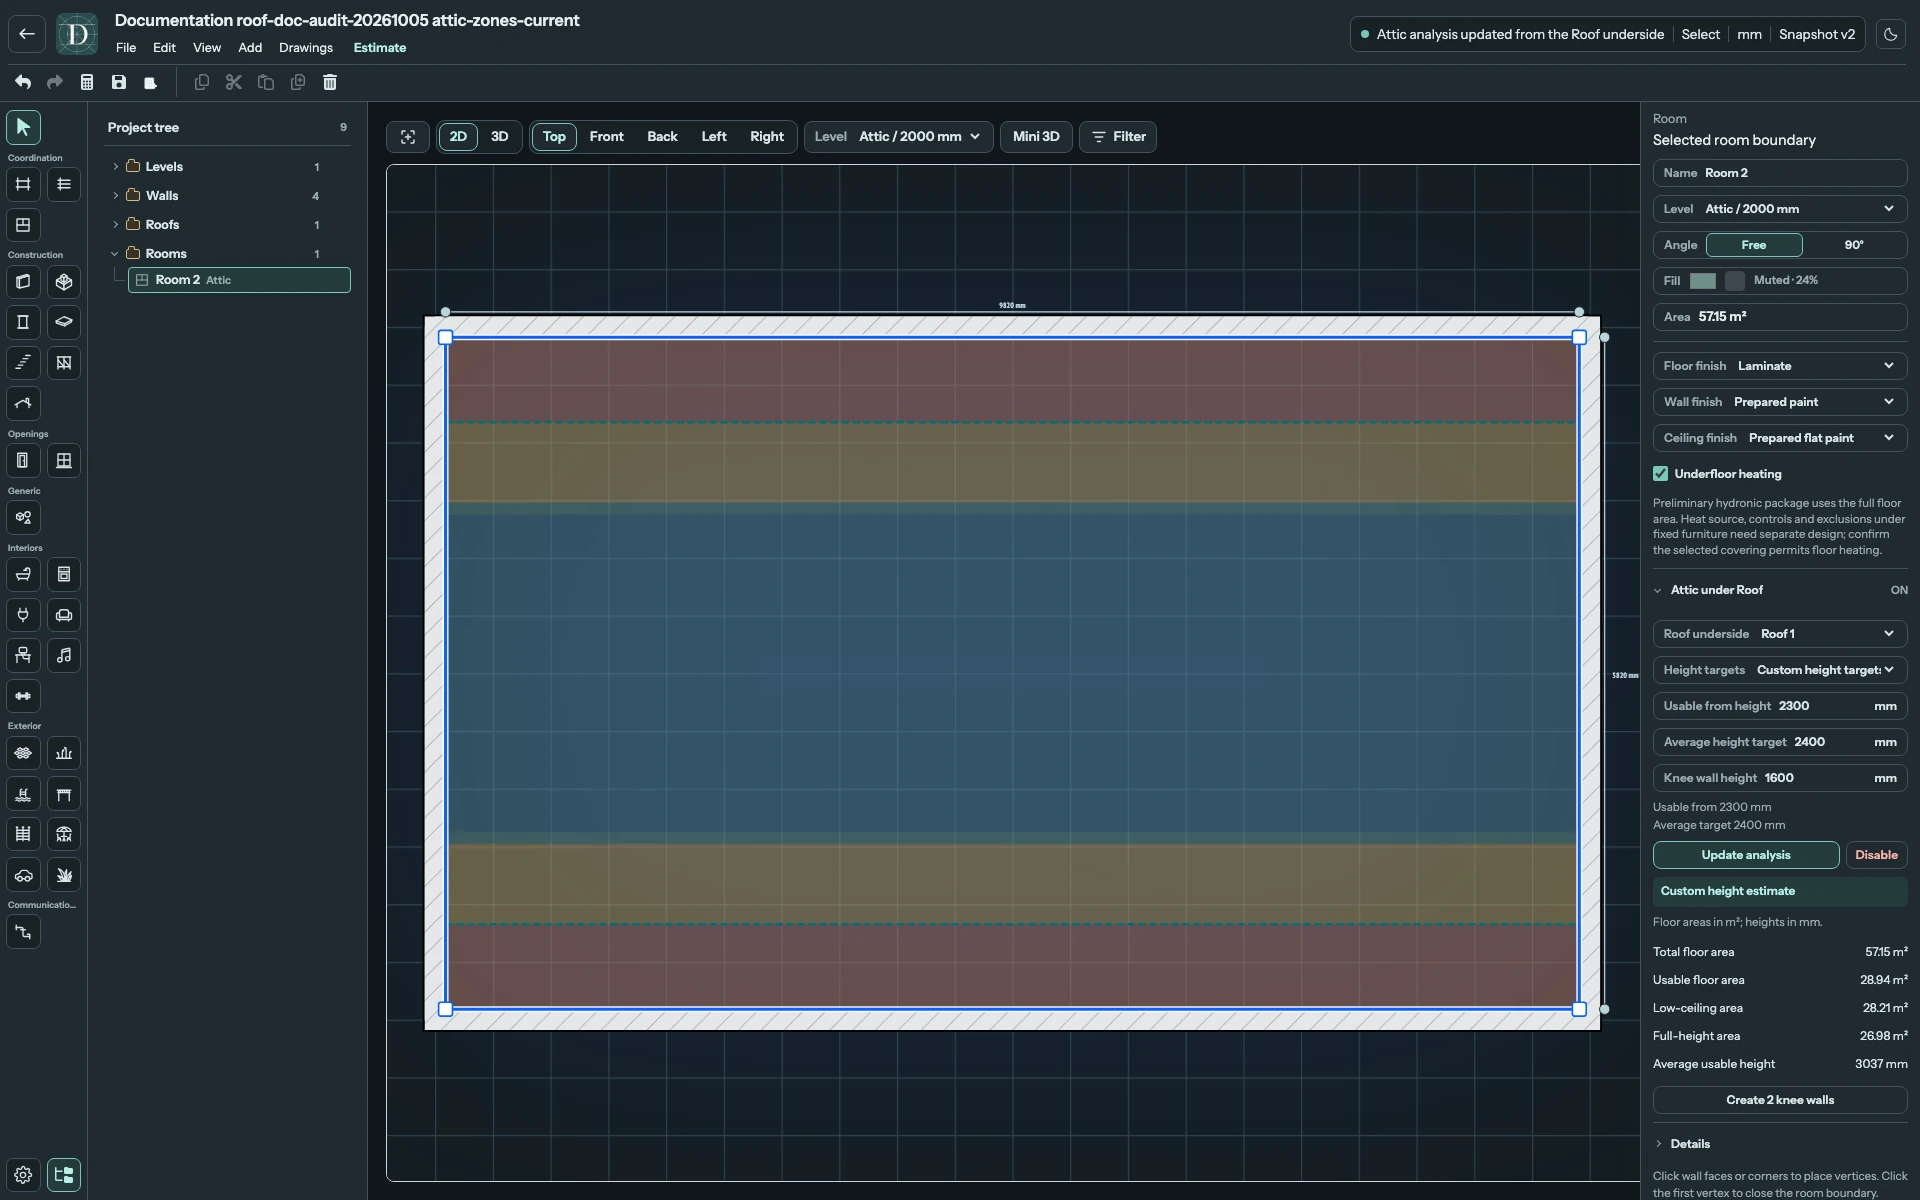
View the updated headroom analysis at full size.
Confirm Knee Walls
Select the Room in Top to review the candidate contours and their relation to existing Walls. You can create the walls here or return to the Roof's Attic section with the same Room chosen. Select Create N knee walls when it is available; the button shows the candidate count. This creates editable Walls trimmed to the Roof underside as one undoable operation. From the Roof's Attic section, the Roof stays selected after creation. Inspect the new Walls in the tree, Top and 3D, then select them to edit with the Wall controls.
If the button says Review overlapping walls, inspect the proposed lines against existing Walls. Change the knee wall height or room geometry only when that change represents your intended design; do not remove a valid bearing Wall simply to enable confirmation. Knee walls already created means the current candidates have been confirmed. Other disabled states can mean there are no new candidates.
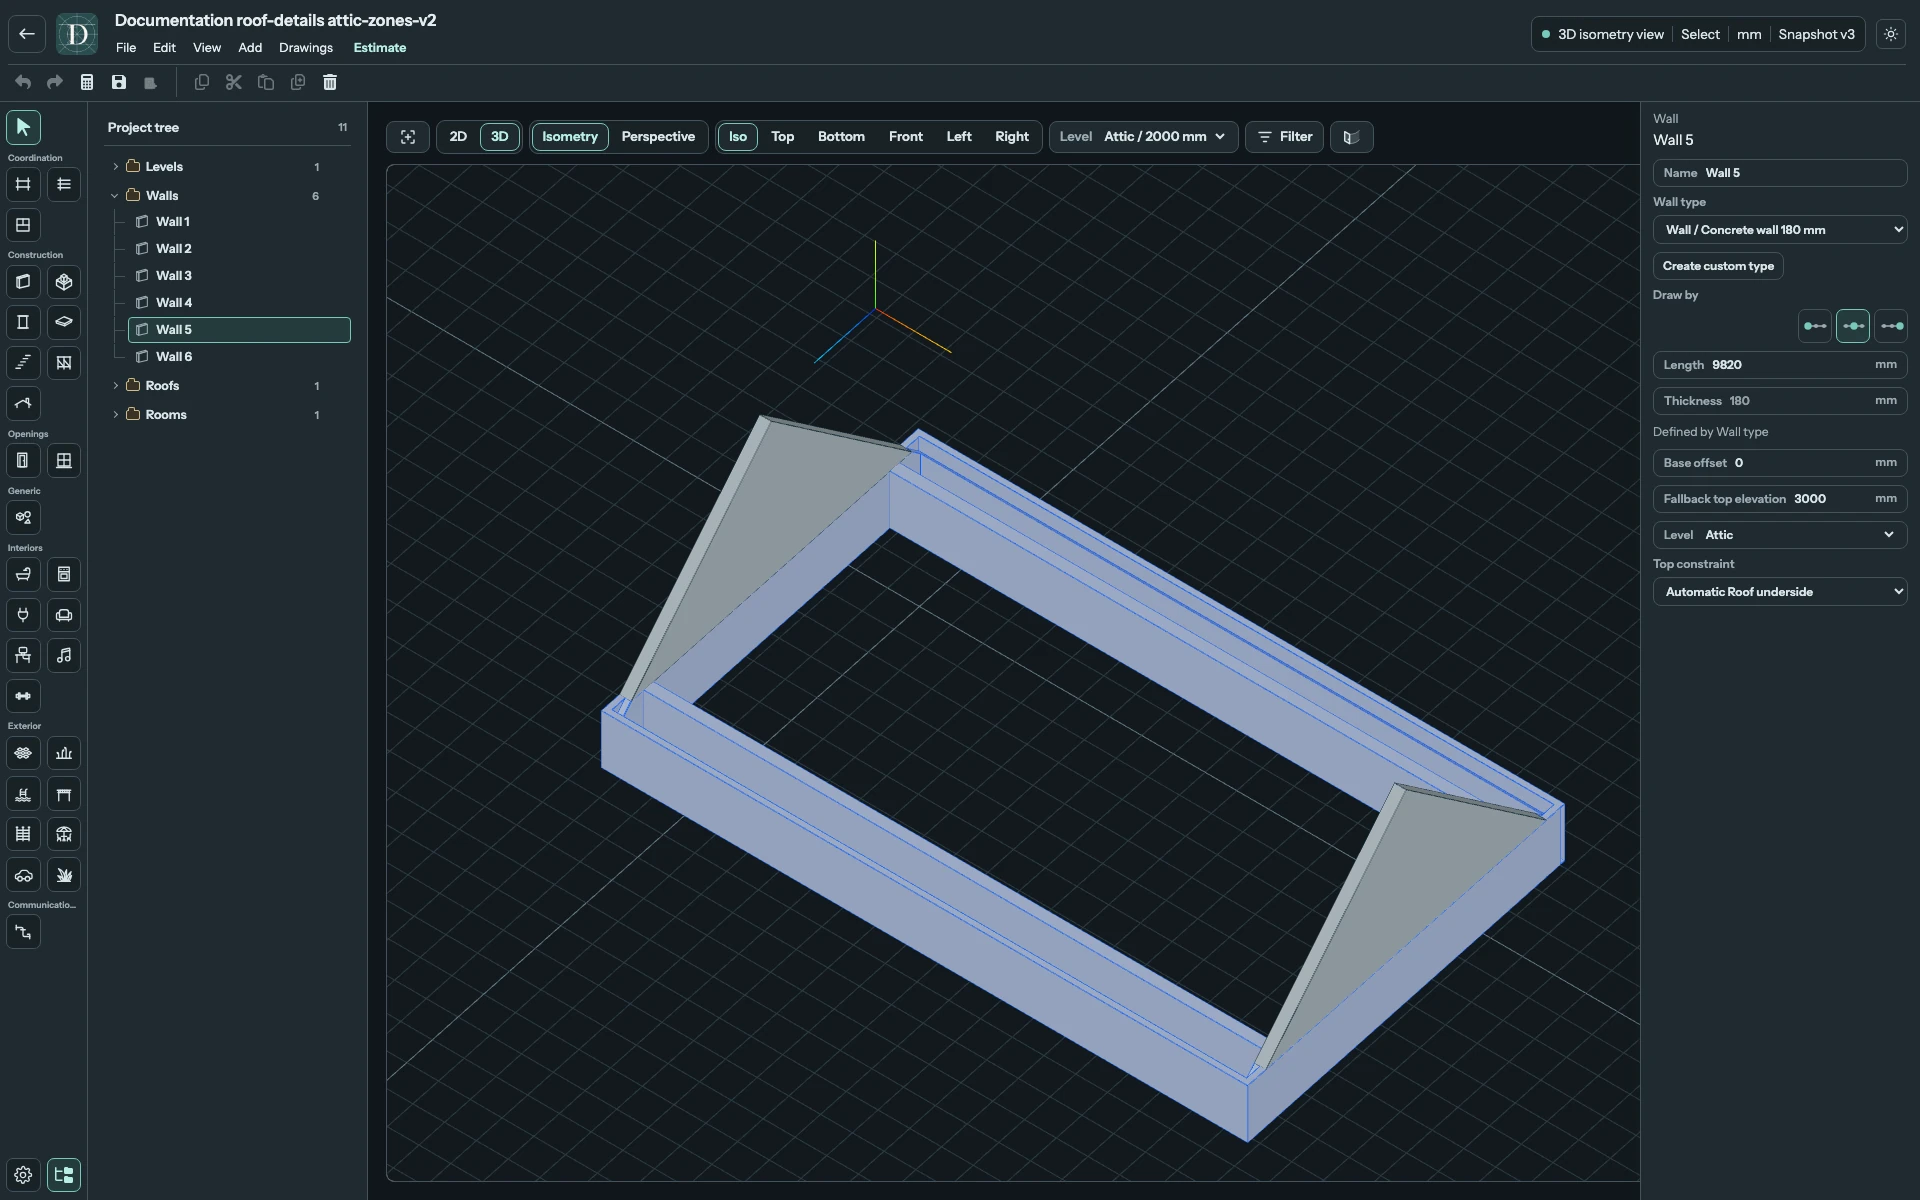
View the created Knee Walls at full size.
Changing or disabling the analysis does not turn confirmed ordinary Walls back into a preview. Review and edit or delete those Walls separately. Disable removes the Room's analysis setup; use Undo to reverse an unwanted completed operation. Save and reopen to check the retained Room-to-Roof binding and Walls.
Inspect the attic interior
An enabled, resolved analysis also displays a roof-following interior lining above the Room in 3D. It is clipped to the Room boundary and the roof's actual openings, and follows the interior reference below resolved framing. Inspect its junctions with perimeter walls and dormer interiors. Show shell hides this lining with the covering; Show framing independently hides the members while retaining their depth in the analysis.
This lining is a modeled interior surface, not an insulation assembly or a specified ceiling construction. Add inclined Roof windows or dormers through Slopes → Add window. Neither headroom bands nor wall candidates place those windows automatically.