
Build a kitchen from individual modules: storage cabinets, drawers, a sink, cooking appliances, a dishwasher and tall units. A module can contain a base unit, a base with a wall unit above it, or a full-height unit. Change its contents, shape and dimensions in the right panel before placement or after selecting it. Neighbouring modules remain individually editable.
The example below is one kitchen along a wall. From left to right it contains a pantry, preparation drawers, a sink, a dishwasher, a hob with an oven, a cabinet and a freestanding refrigerator. Wall cabinets and a hood sit above the worktop. The same arrangement appears in both views.
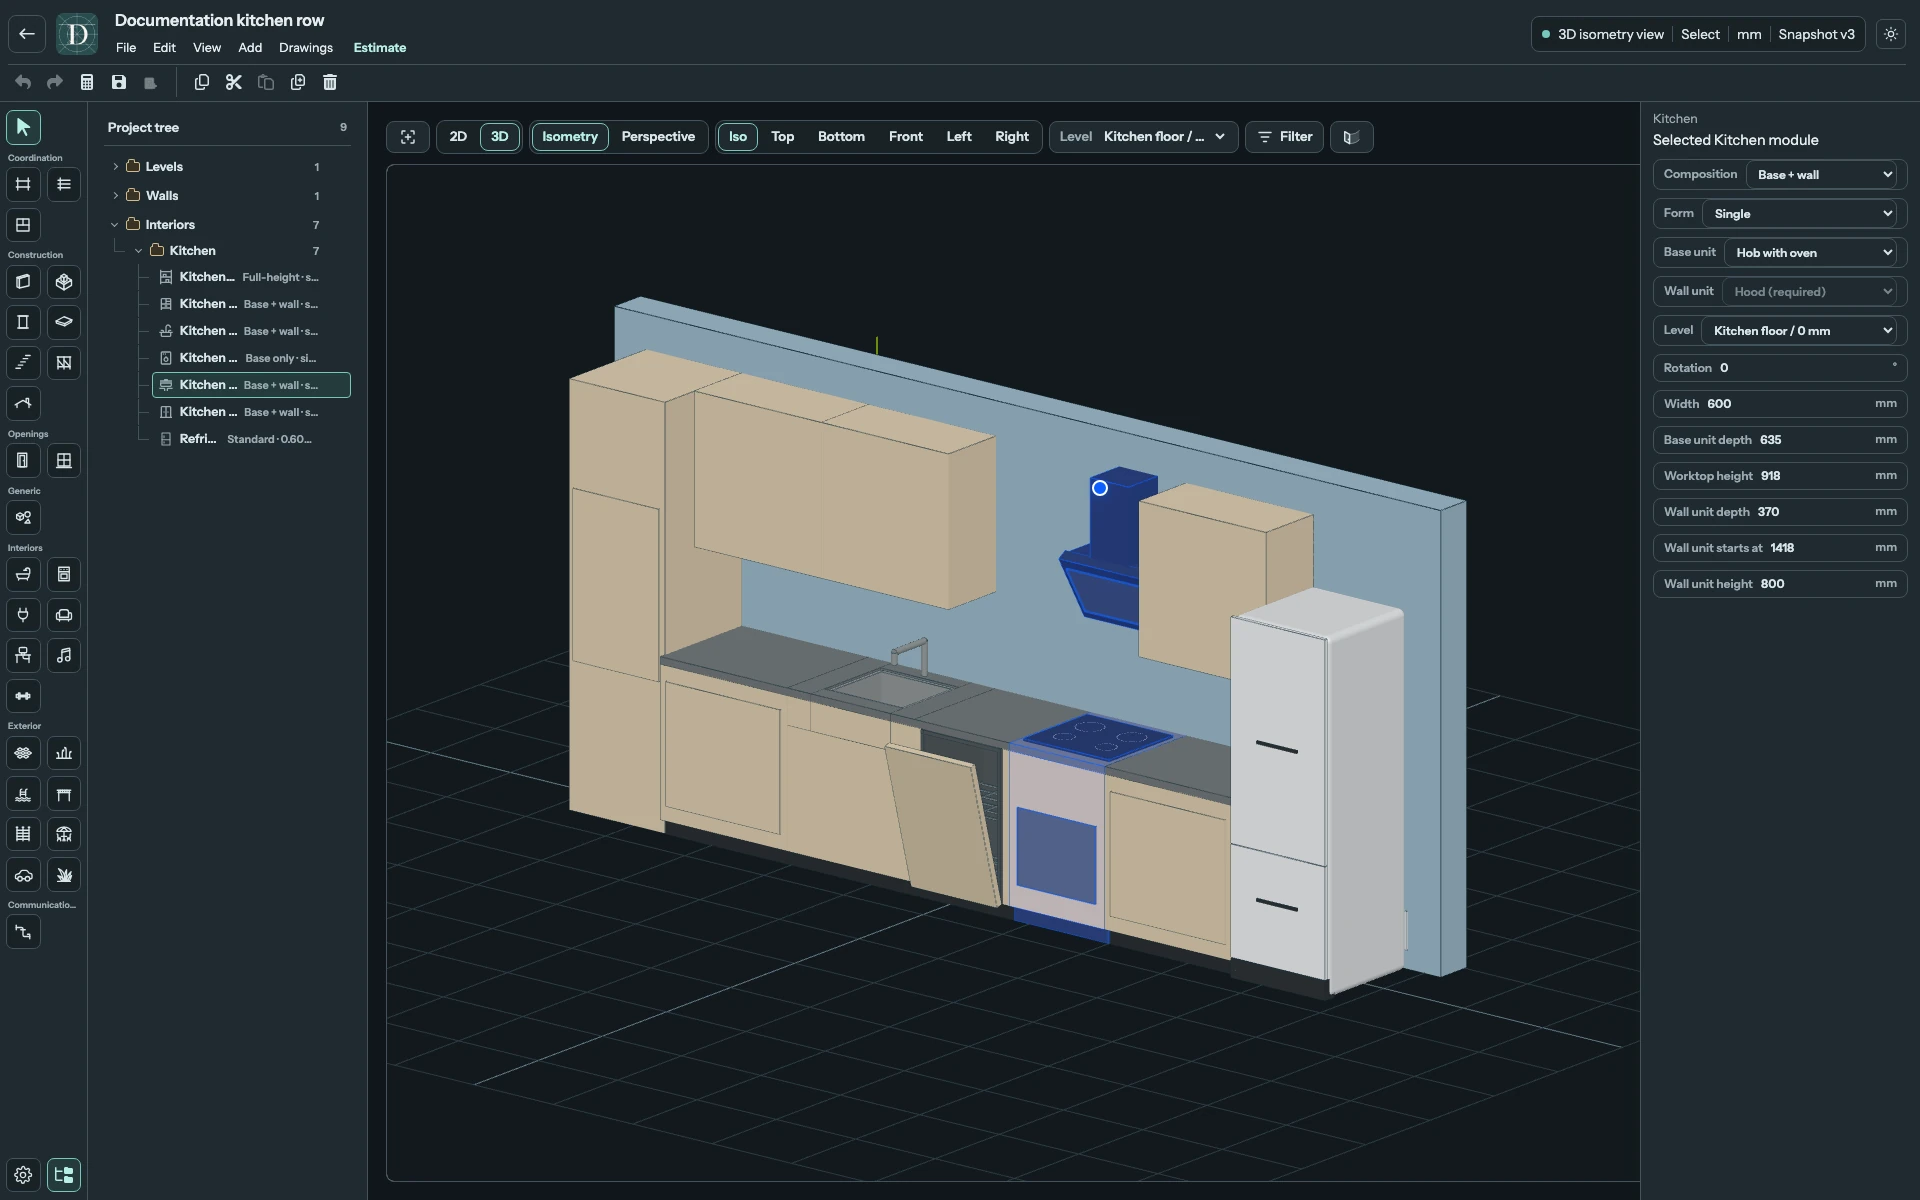
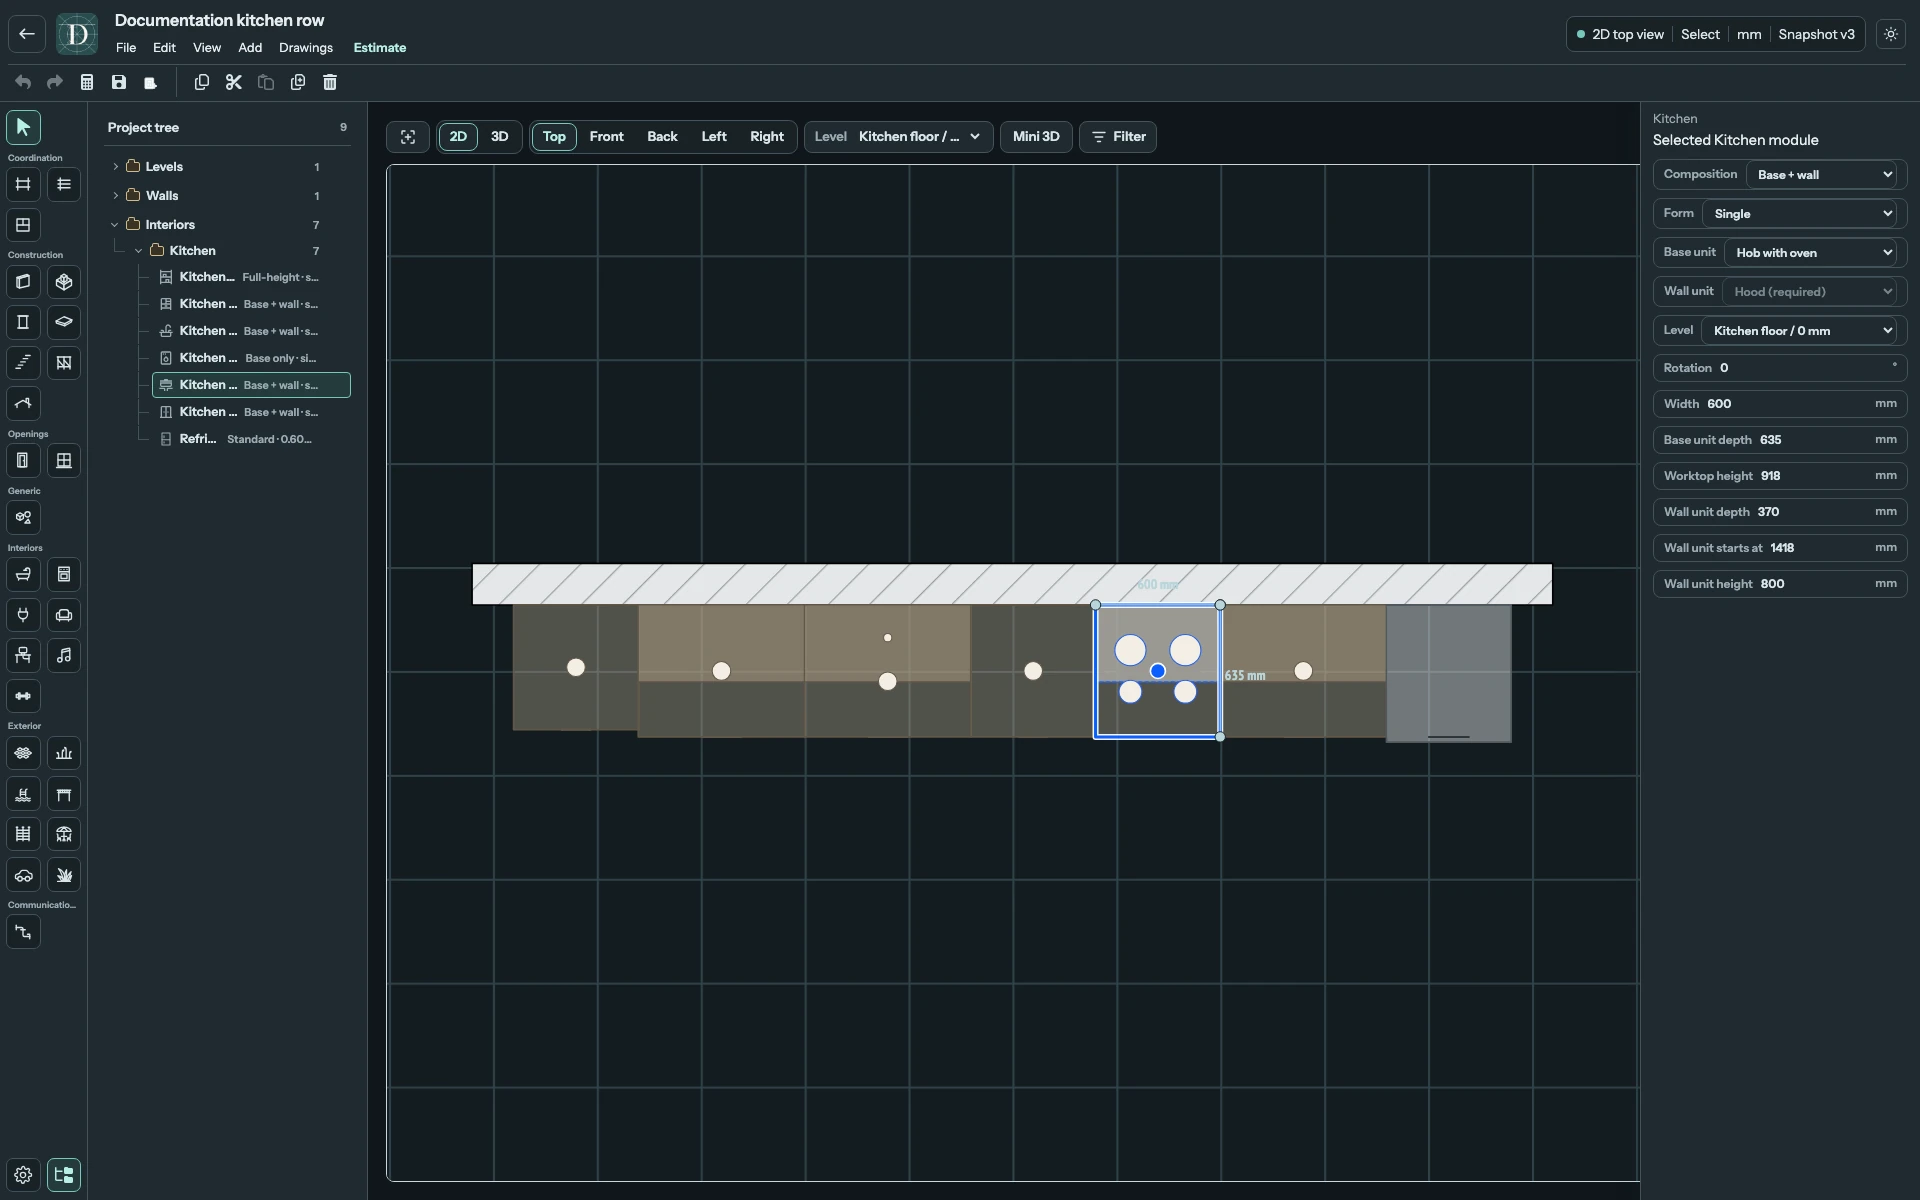
Place the first module and build the row
- Choose 2D → Top and select the Level for the kitchen floor.
- Open Interiors → Kitchen and choose a starting item from the table below.
- In the right panel, choose Composition, Form and the unit contents. Set the dimensions for your layout; the example values in this guide are demonstration values, not measurements you must copy.
- Position the preview beside the wall, with its rear edge facing the wall. Click to place it.
- Choose the next item, use the same Level, Rotation and worktop height, and position it beside the first module. Use Top to line up their rear edges and check the gap between their sides. Click to place it.
- Choose Select to inspect a placed module. Switch to 3D to check fronts, worktops, wall cabinets and appliance placement.
The kitchen menu provides these starting configurations. Each is still the same configurable Kitchen module tool.
| Menu item | Starting configuration | Use it for |
|---|---|---|
| Cabinet | Single base cabinet with a wall cabinet | General storage and worktop space. |
| Drawers | Single base unit with drawers | Storage below the preparation worktop. |
| Sink | Single sink base with a wall cabinet | A sink and tap in the worktop. |
| Hob with oven | Single hob/oven base with a required hood | A combined cooking module. |
| Oven | Single oven base | An oven below a worktop without a hob above it. |
| Dishwasher | Single dishwasher base | A built-in dishwasher; its 3D representation includes an open door and racks. |
| Washing machine | Single washing-machine base | A washing machine integrated into the kitchen row. |
| Pantry | Single full-height pantry | Tall storage or a starting point for an appliance tower. |
| Refrigerator | A separate freestanding appliance | Its own dimensions and door layout; see Kitchen appliances. |
Composition: which parts the module contains
| Composition | Result | Settings that appear |
|---|---|---|
| Base only | A lower unit and its worktop. | Base unit, base depth and worktop height. |
| Base + wall | A lower unit with an upper unit or hood in the same module. | Base and wall contents, base dimensions, wall depth, starting height and height. |
| Full height | One tall unit instead of separate base and wall units. | Tall unit contents, depth and height. |
Changing Composition replaces the arrangement while the module stays in position. Check the resulting dimensions: newly added parts start with default dimensions. The upper unit's width follows the lower unit's width; it is not a separately positioned object.
For a worktop below a window, use Base only, or Base + wall with Wall unit → None. For a tall appliance tower, use Full height and choose its contents under Tall unit.
Form: straight, double or corner
| Form | What changes | Available configurations |
|---|---|---|
| Single | A straight module of one supported width. | All base contents and all tall contents. |
| Double | A wider straight module; base and wall parts widen together. | Cabinet, drawers or sink in a base composition; tall configurations can also use this form. |
| Corner | An L-shaped module with two separately sized legs. | Base cabinet or sink, with a wall cabinet or None. Full height is unavailable. |
For an L-shaped kitchen, place one Corner module at the meeting of the walls, then place straight modules along each leg. Corner leg A and Corner leg B determine the overall leg lengths. Base unit depth determines the depth of the L-shaped arms.
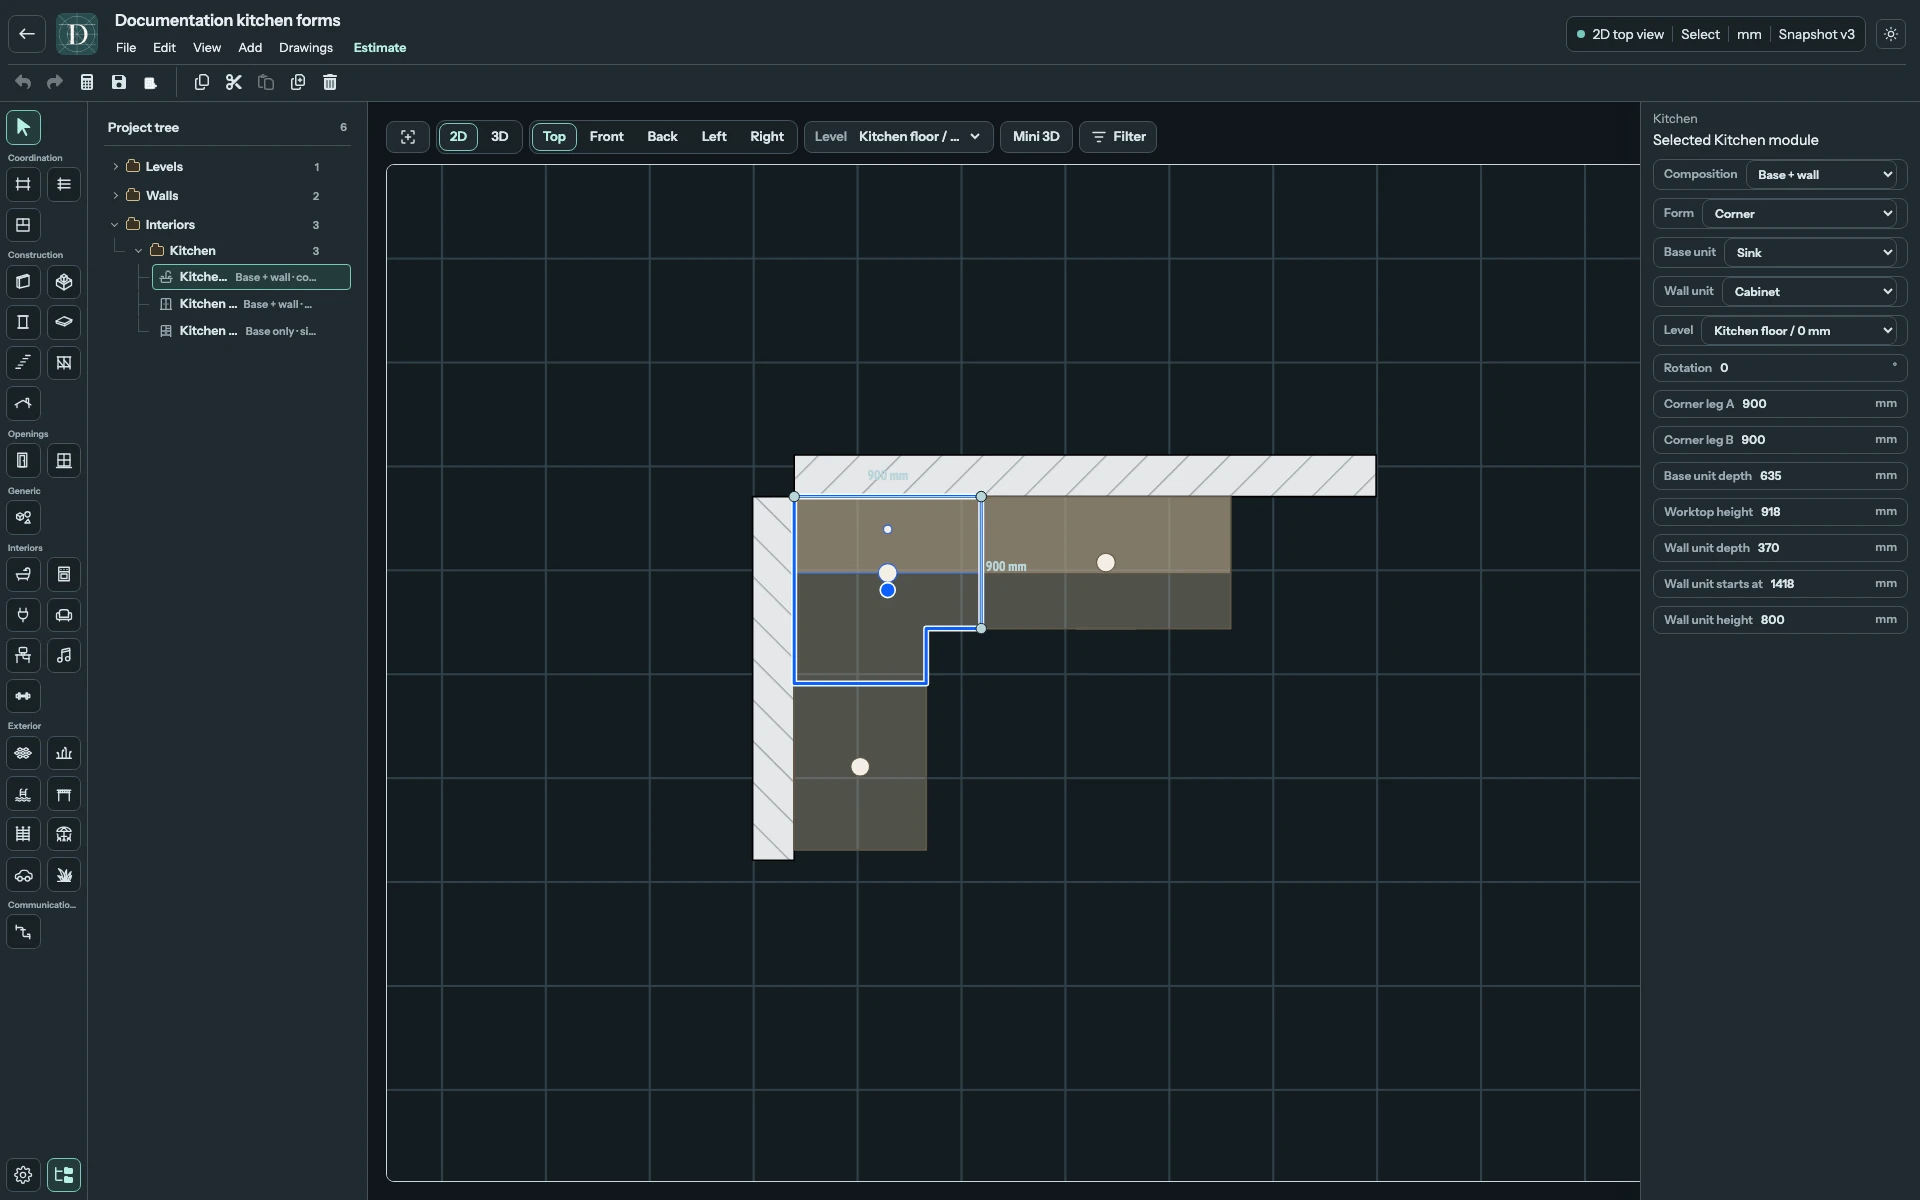
Open the full-size Corner plan.
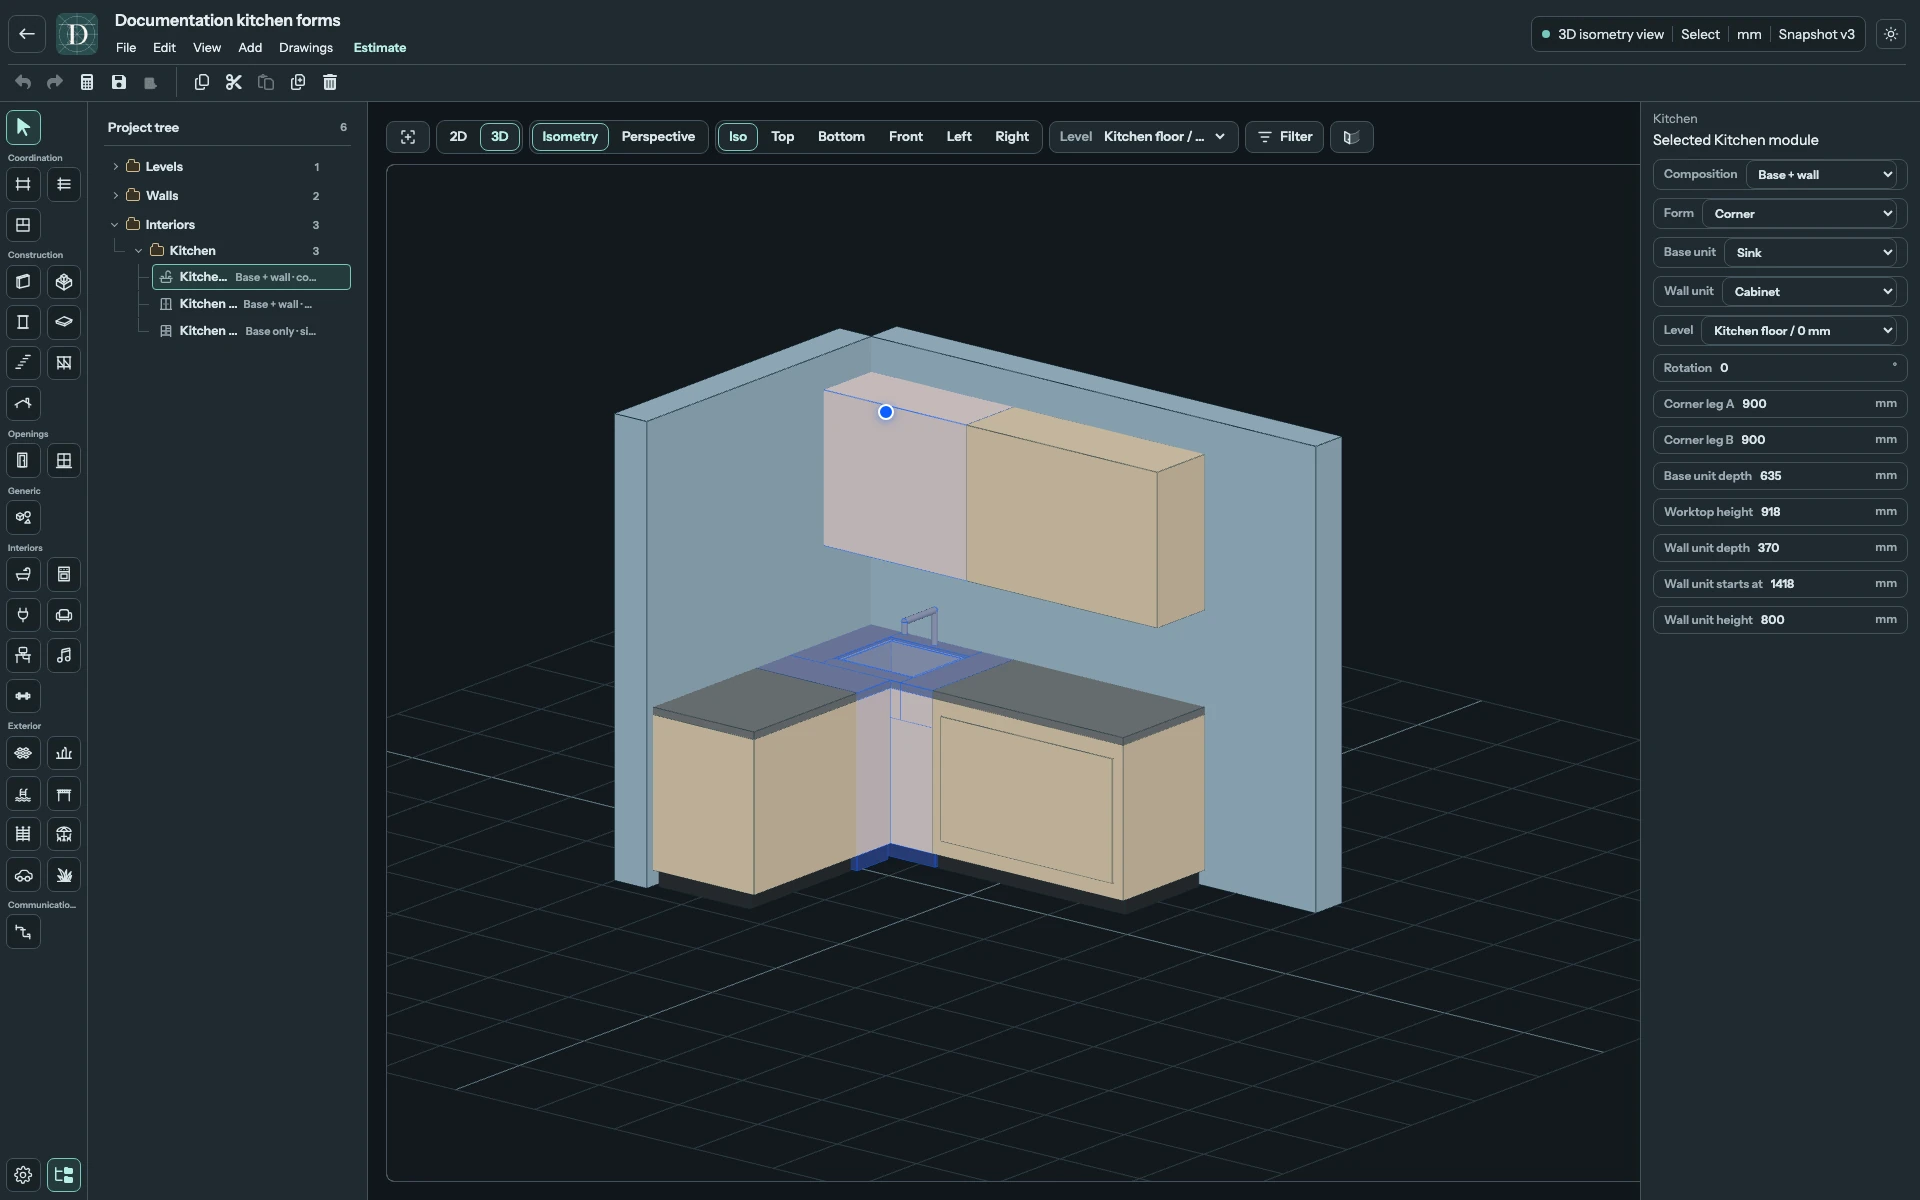
Open the full-size Corner 3D view.
Change an incompatible appliance to Cabinet or Sink before choosing Corner, or to Cabinet, Drawers or Sink before choosing Double. An unsupported change leaves the existing module unchanged.
Base unit: storage and appliances
| Base unit | What it models | Form and width |
|---|---|---|
| Cabinet | A cabinet front below a worktop. | Single: 300, 400, 600 or 800 mm. Double: 1000 or 1200 mm. Corner: use the leg fields. |
| Drawers | Drawer storage below a worktop, represented by one schematic front panel in 3D. | Single: 300, 400, 600 or 800 mm. Double: 1000 or 1200 mm. |
| Sink | A worktop sink and tap. | Single: 600 or 800 mm. Double: 1000 or 1200 mm. Corner: use the leg fields. |
| Hob | A hob above a base unit, without an oven. | Single, 600 mm; requires Base + wall and a hood. |
| Hob with oven | A hob with an oven underneath. | Single, 600 mm; requires Base + wall and a hood. |
| Oven | A built-in oven below the worktop. | Single, 600 mm. |
| Dishwasher | A dishwasher body, racks and open door. | Single, 600 mm. |
| Washing machine | A washing-machine body, controls and circular door. | Single, 600 mm. |
These are the widths accepted by the editor, shown in mm. If your project uses another length unit, enter their equivalent values. Choosing contents that require another width can reset the module to a supported width. Recheck its fit beside neighbouring modules afterwards.
Wall unit: cabinet, microwave, hood or open space
Wall unit appears for Base + wall.
| Wall unit | Result |
|---|---|
| Cabinet | A wall cabinet above the lower unit. |
| Microwave | A microwave within the upper unit; unavailable in Corner. |
| None | No upper unit; the lower unit and worktop remain. |
| Hood (required) | The hood paired with Hob or Hob with oven, chosen automatically. |
For a cooking module, the tool keeps Composition → Base + wall and locks Wall unit to Hood (required). To change that arrangement, first change Base unit away from Hob or Hob with oven. Wall contents return to Cabinet and can then be changed normally.
Wall unit starts at measures the bottom of the upper unit from the Level, not the gap above the worktop. In the example, 1418 mm minus the 918 mm worktop height gives a 500 mm gap. Choose both heights together for your layout.
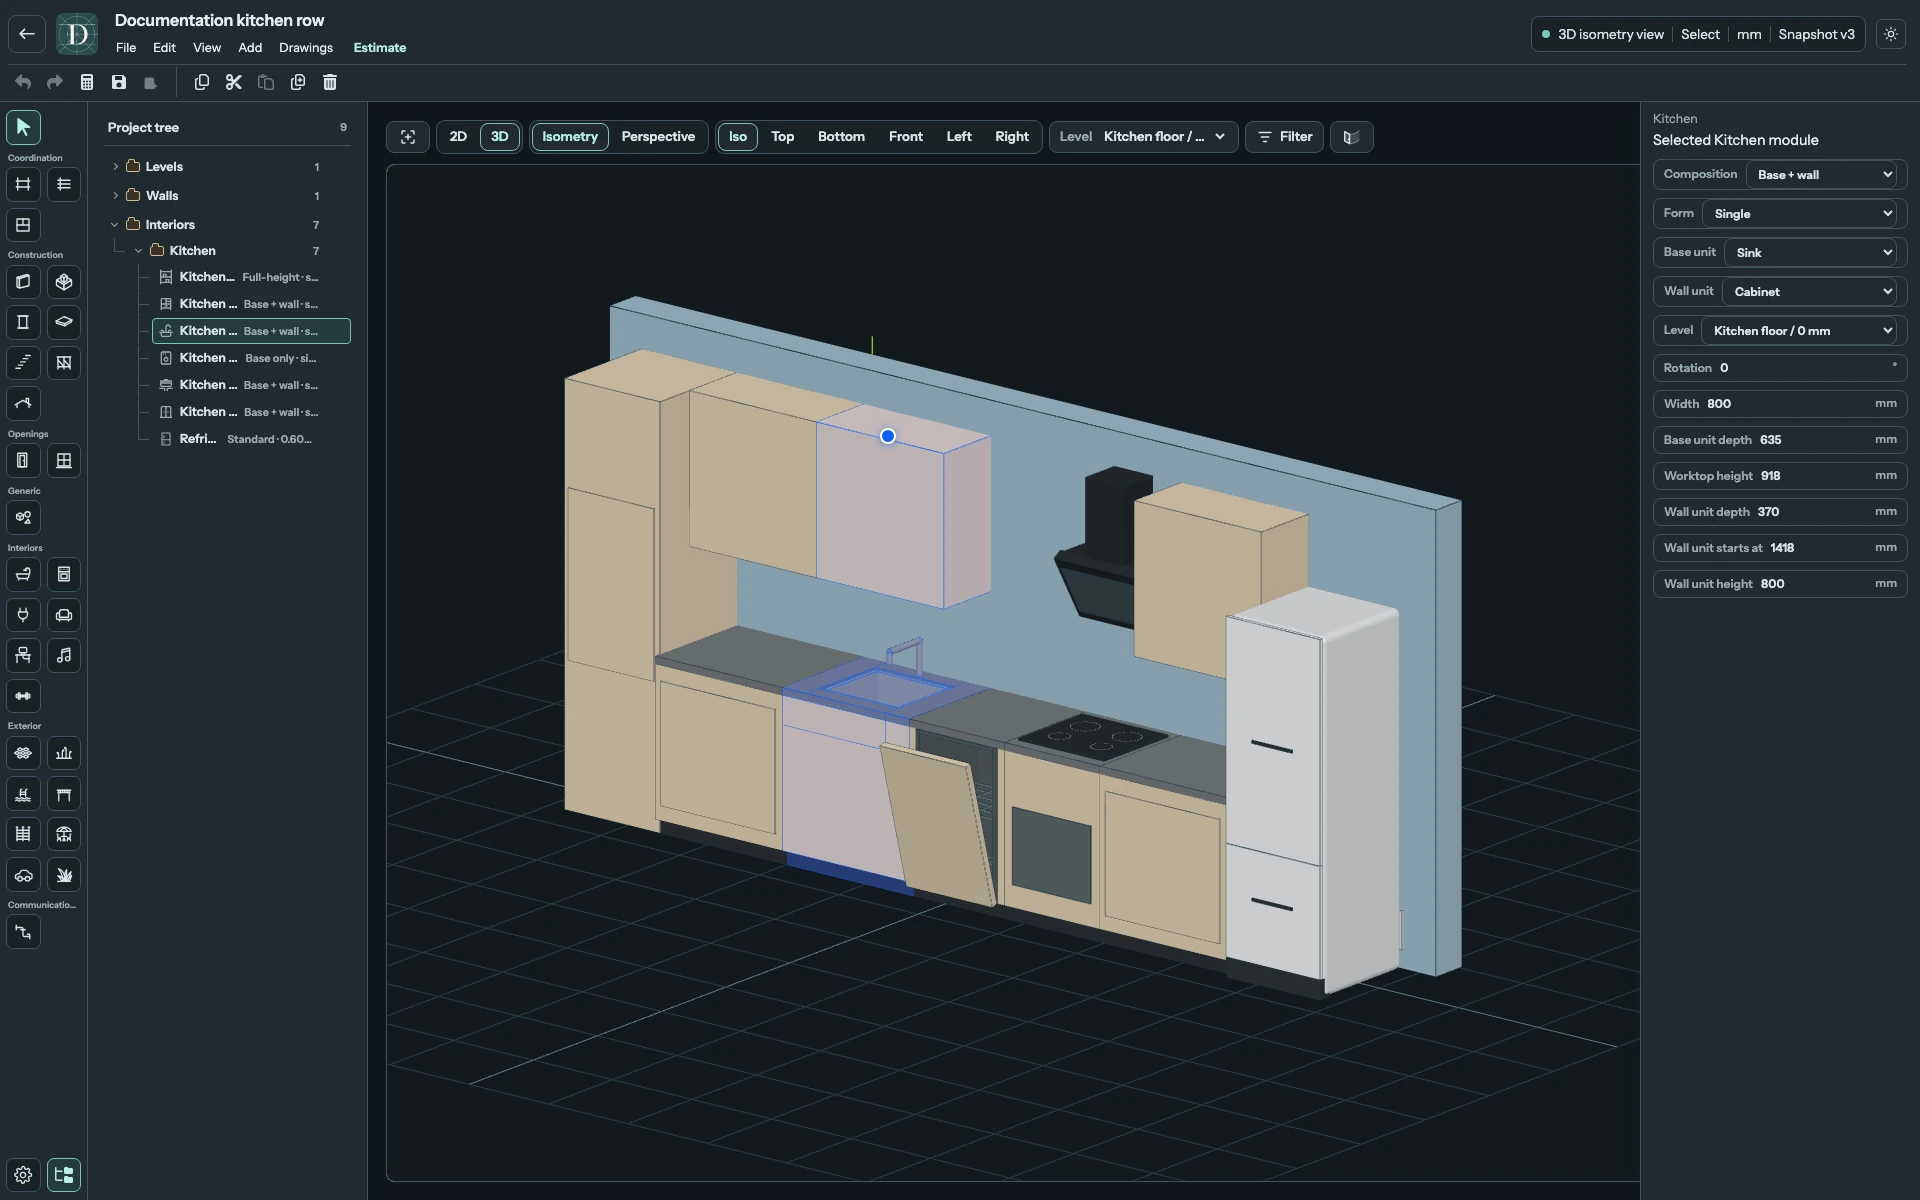
Open the full-size Sink settings view.
Tall unit: pantry and appliance towers
Tall unit appears for Full height. It starts at the selected Level and uses Tall unit depth and Tall unit height.
| Tall unit | Result |
|---|---|
| Pantry | A full-height storage cabinet. |
| Refrigerator housing | A tall built-in refrigerator configuration within the module, unlike a separate Refrigerator object. |
| Oven tower | An oven integrated into a tall cabinet. |
| Oven and microwave tower | A tall cabinet containing both oven and microwave. |
The model uses simplified appliance fronts. In the combined tower, the oven and microwave currently share one schematic front panel in 3D. Use Tall unit to identify the configuration; this view does not show their separate installation openings.
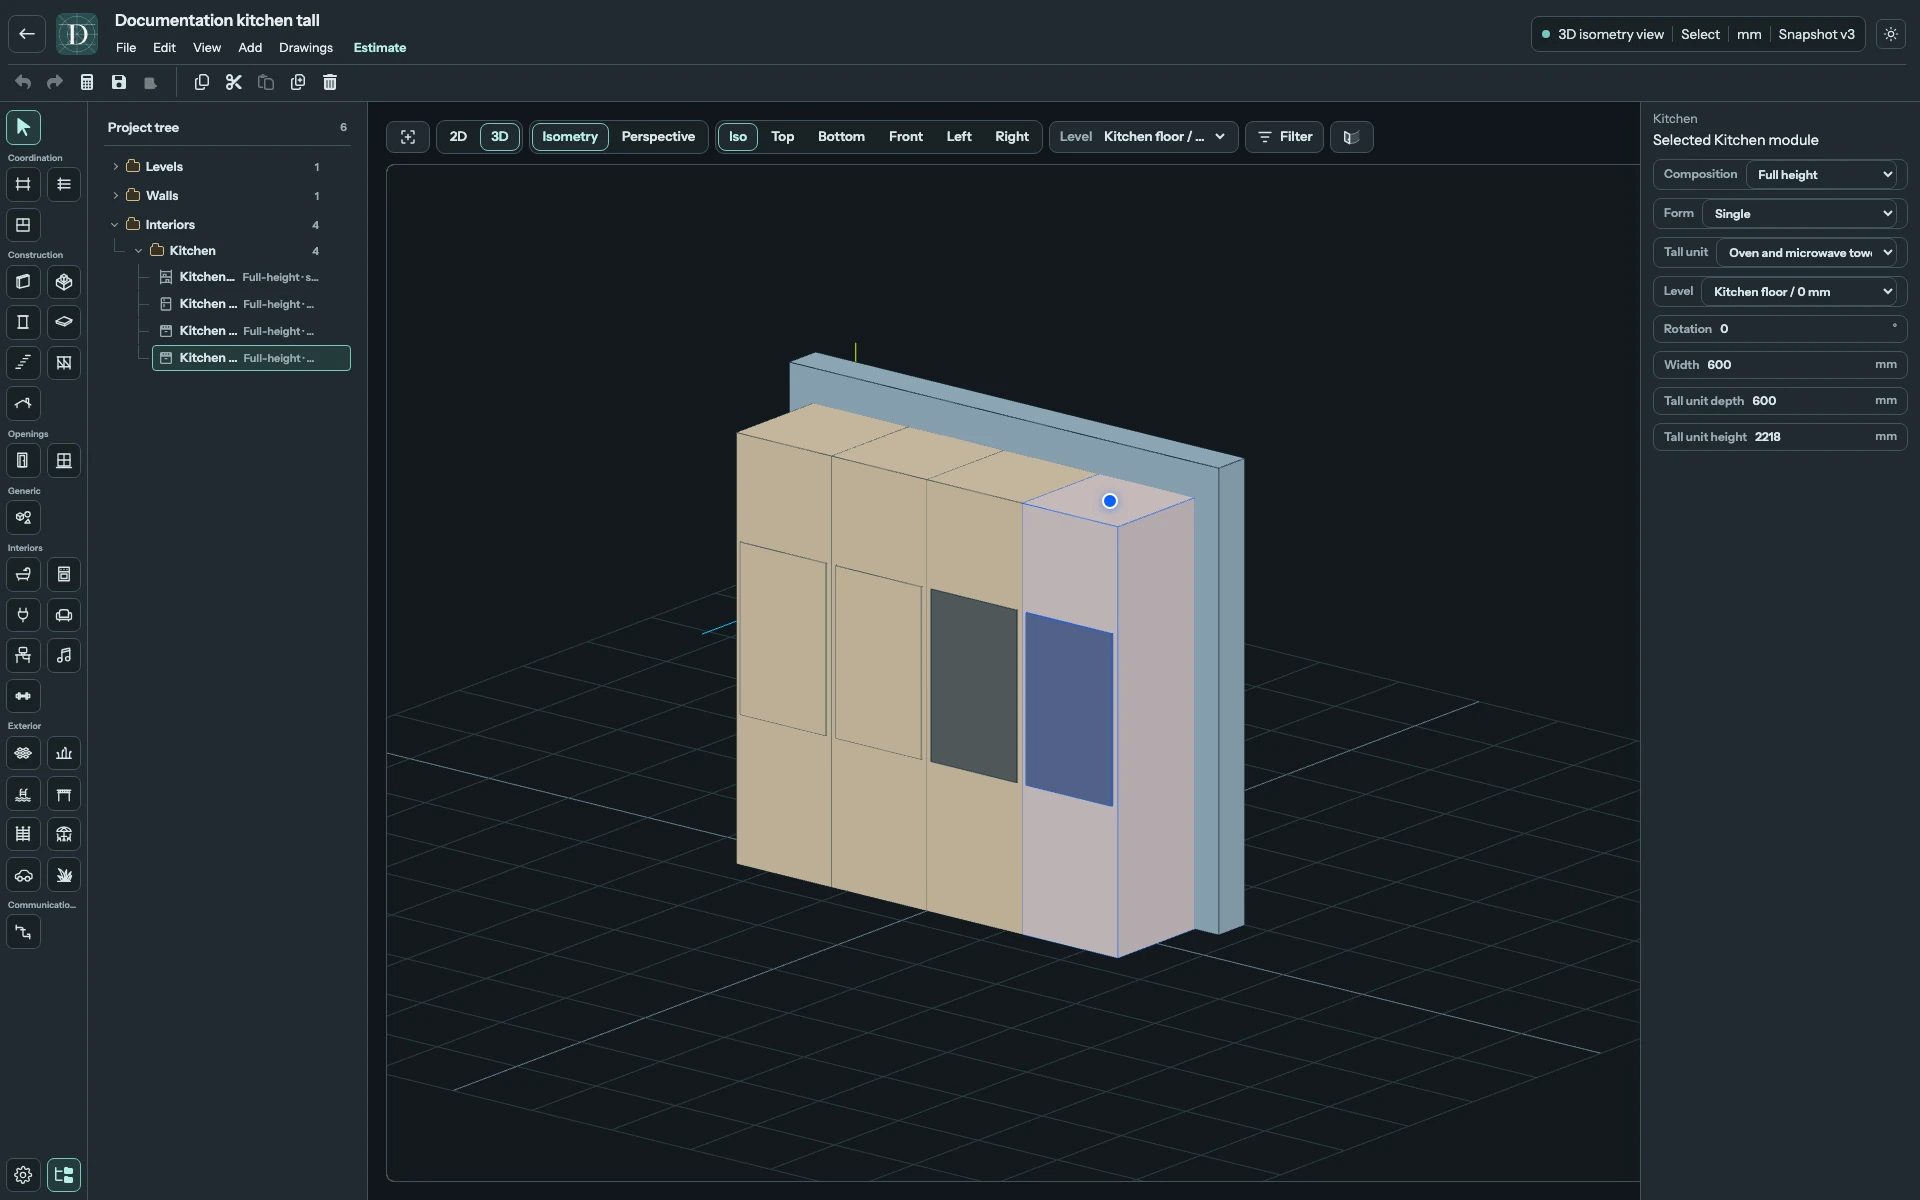
Open the full-size tall-unit comparison.
Dimensions, height, Level and Rotation
| Setting | What you change | Availability and accepted values |
|---|---|---|
| Level | The floor datum from which heights are measured. | All configurations. Choose an existing Level; changing its elevation moves the module vertically. |
| Rotation | The direction the module faces, in degrees. | All configurations. Use 90° for a perpendicular return; angles are normalised to one turn. |
| Width | Width across the straight front. | Single or Double, depending on contents. Single Pantry: 300, 400, 600 or 800 mm; other Single tall variants: 600 mm. Double: 1000 or 1200 mm. Base widths are listed above. |
| Corner leg A / Corner leg B | Overall lengths of the corner arms. | Corner only. Each must be at least the Base unit depth. |
| Base unit depth | Rear-to-front depth of lower unit and worktop. | Base only / Base + wall. Minimum 450 mm. |
| Worktop height | Height of the worktop's top surface above the Level. | Base only / Base + wall. Minimum 650 mm. |
| Wall unit depth | Rear-to-front depth of the upper unit. | Base + wall. At least 200 mm; no greater than Base unit depth. |
| Wall unit starts at | Height of the upper unit's bottom above the Level. | Base + wall. At least Worktop height + 200 mm. |
| Wall unit height | Height of the upper unit itself. | Base + wall. Minimum 300 mm. Its top is starting height plus this height. |
| Tall unit depth | Rear-to-front depth of the tall unit. | Full height. Minimum 450 mm. |
| Tall unit height | Total height above the Level. | Full height. Minimum 1500 mm. |
These limits describe the tool's geometry controls. Choose dimensions and appliance clearances for your actual design. The demonstration's 635 mm base depth, 918 mm worktop height and 2218 mm tall-unit height are example values.
For matching worktops, give each base module the same Worktop height and Level. To align wall-cabinet tops with a tall unit, make Wall unit starts at plus Wall unit height equal Tall unit height. Editing one module does not resize its neighbours.
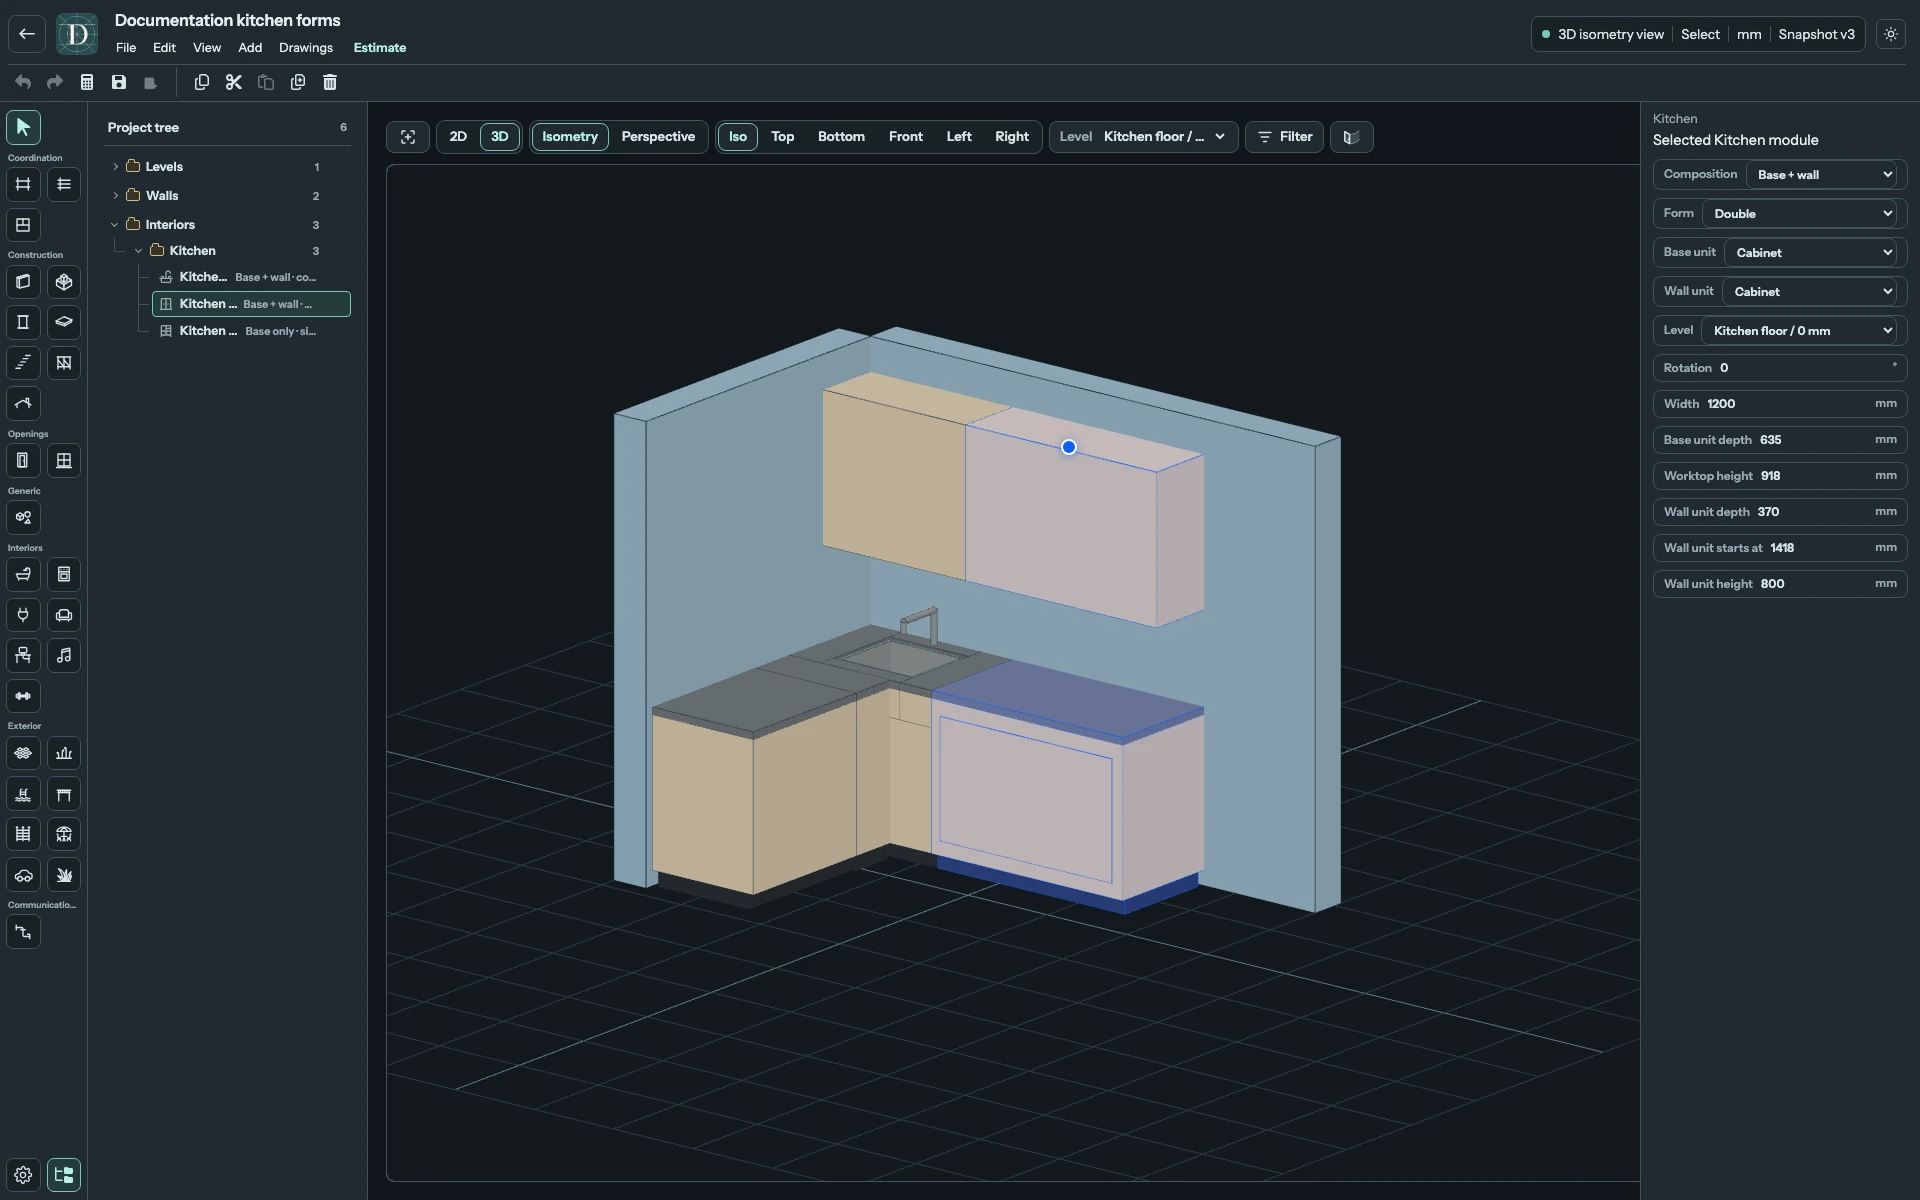
Open the full-size Double settings view.
Move, rotate, change and remove a module
Choose Select, then click the module or its row under Interiors → Kitchen in the Project tree. The right panel now edits that object. Dragging a selected module moves it. Its rotation controls turn it; Rotation gives an exact angle. Use Top for precise alignment, then inspect fronts and heights in 3D. See move and reshape for the handles.
Modules use free placement. Line up their edges manually in Top; the preview does not automatically dock to a wall or neighbouring module. Moving a wall or a module does not carry the whole kitchen with it.
A module whose centre is inside a same-Level Room belongs to that Room; otherwise it belongs to the storey. Removing or changing a Room can detach this association. A Room outline is not a cabinet host.
Use Undo and Redo to revise an edit, and the selected-object delete action to remove one module. Save and reopen to inspect the configuration before continuing. Sink, hob and appliance geometry does not create connected plumbing or electrical networks.
Related: Kitchen appliances, change an object's Level, and save and reopen.