
A dormer is a vertical window projecting from a pitched roof slope, with a frame, glazing, side walls and a small roof. Choose a rectangular or triangular opening. A Roof window lies in the main roof plane instead. Both are children of their supporting slope and remain owned by the Roof. On a Flat Roof, use a horizontal Roof window; a dormer cannot be placed on a horizontal surface.
Add a window inside its slope
- Select the Roof and open Slopes. Select the surface that should carry the window; it highlights in the model.
- Select Add window inside that slope. In Type, choose Dormer window.
- In Dormer type, choose Rectangular window or Triangular window, then select Add window.
- The complete dormer appears at a valid position near the slope's center. Its child row opens in the same slope with its settings. Inspect it in Top, side views and 3D before saving.
No outline drawing is needed. Cancel or Esc closes the dialog without changing the model. If no complete dormer fits, the editor explains the problem and leaves the Roof unchanged. Choose another slope or adjust the roof or window dimensions.
A new rectangular window starts at 900 mm high. On a low slope it can start at 600 mm so its small ridge stays below the main ridge. The editor chooses this size only when adding a new window; it does not shrink an existing window after you edit its dimensions. Check the initial size in the child's settings.
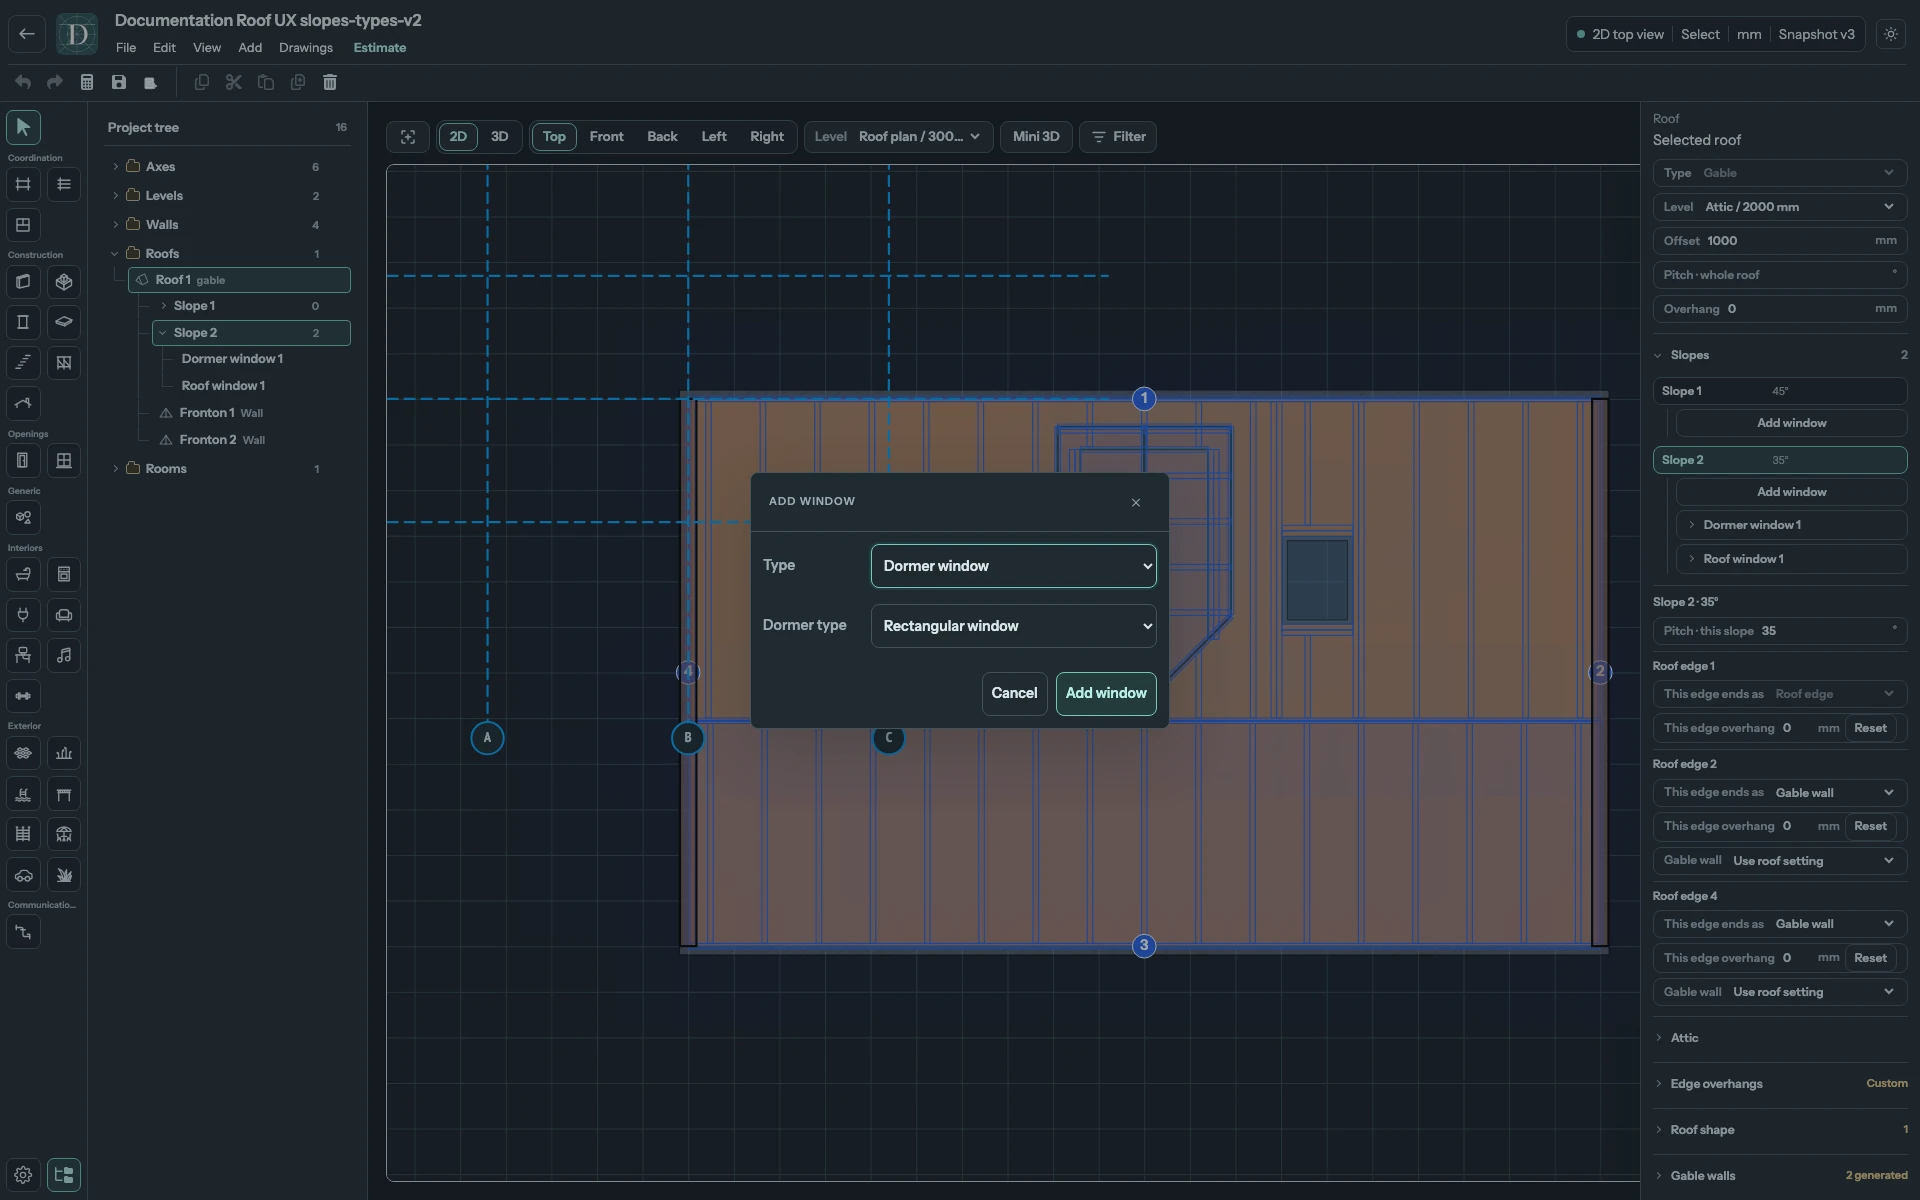
View the Add window dialog at full size.
Two opening shapes
| Type | What changes |
|---|---|
| Rectangular window | A rectangular frame and glazing beneath a front gable. The small roof follows the host slope's pitch. |
| Triangular window | A true triangular frame and glazing. Its small roof follows the window profile; changing the window's width or height also changes that roof's pitch. |
Select an existing child and change Type to switch shapes. It keeps its identity, window dimensions and floor sill. The small roof's eave height is recalculated for the new opening shape. A shape that cannot fit is rejected before it changes the model.
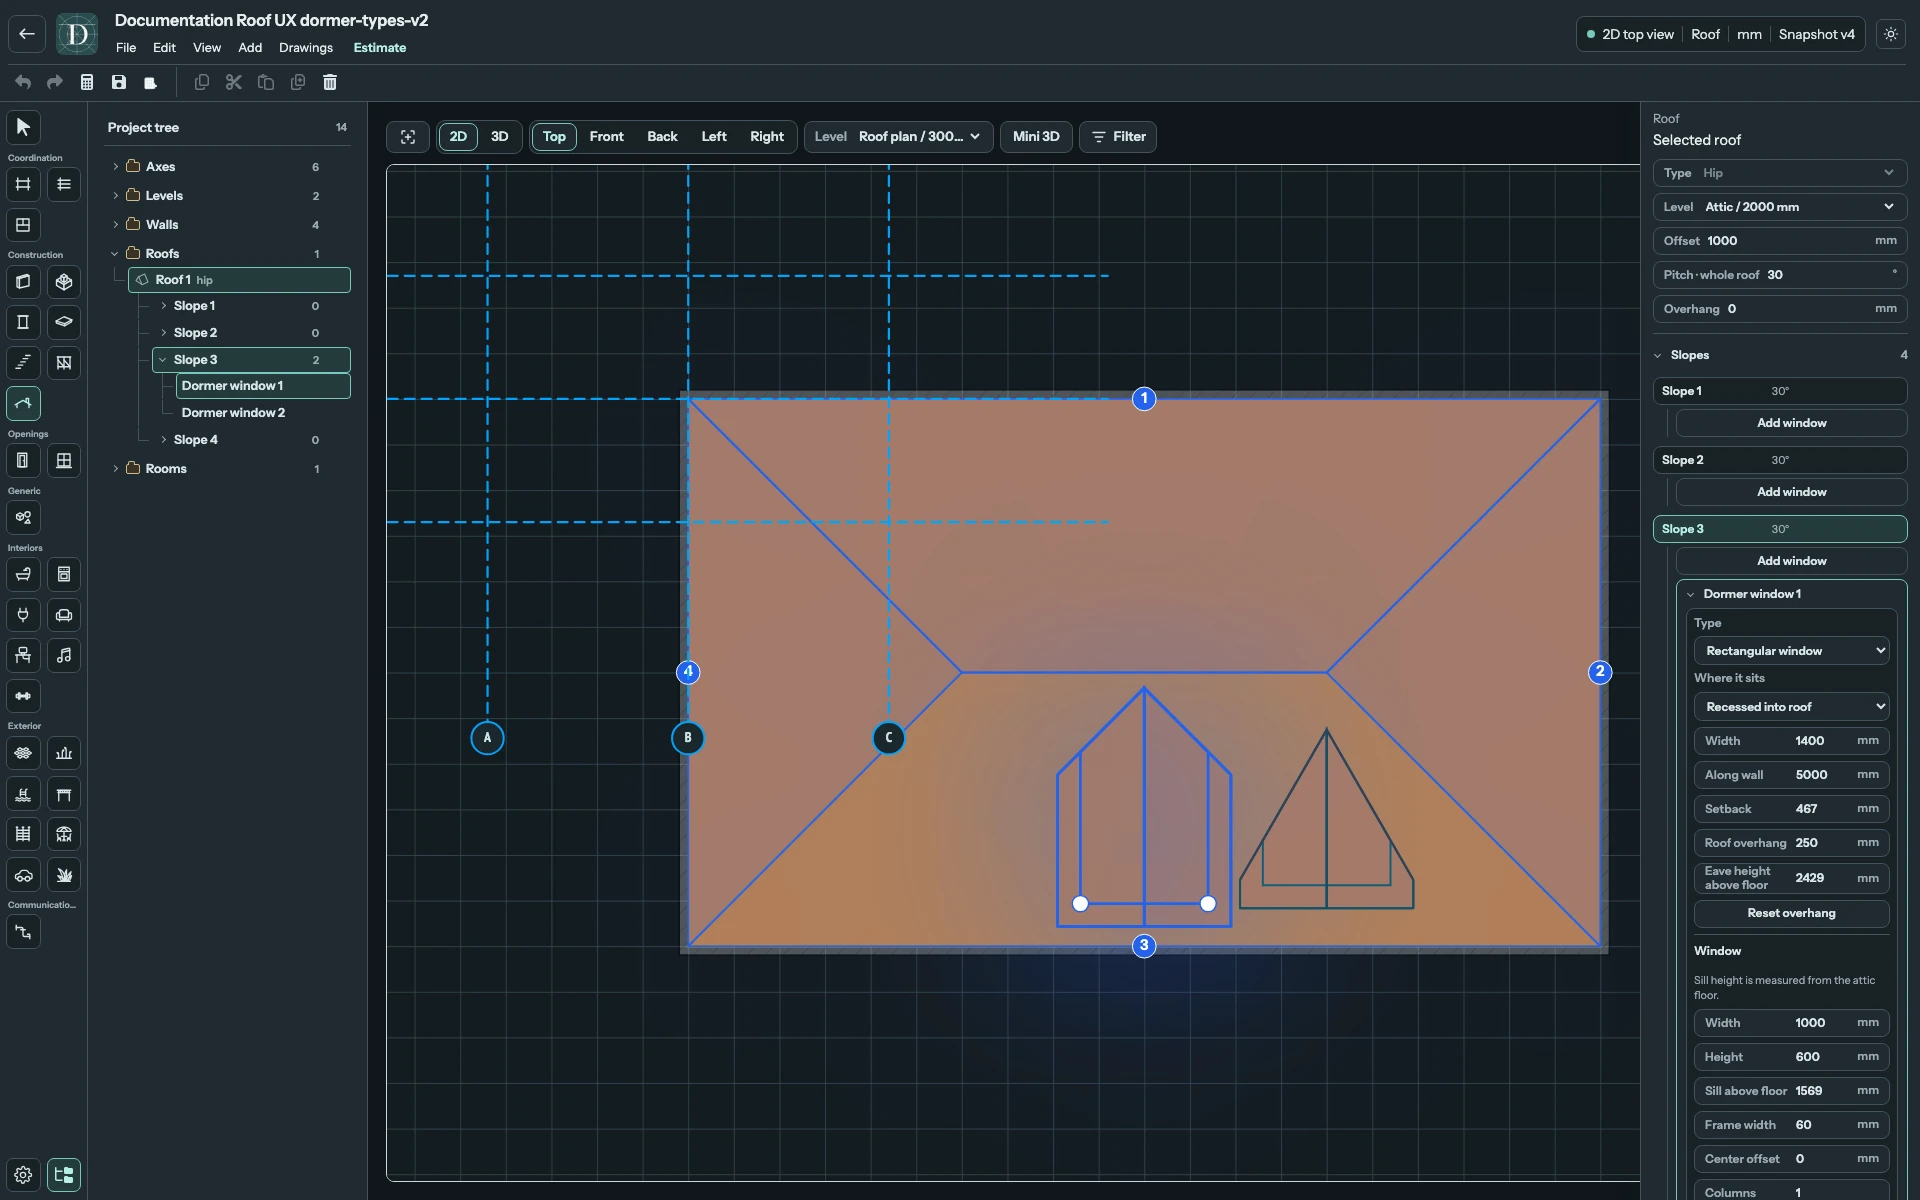
View the rectangular Top example at full size.
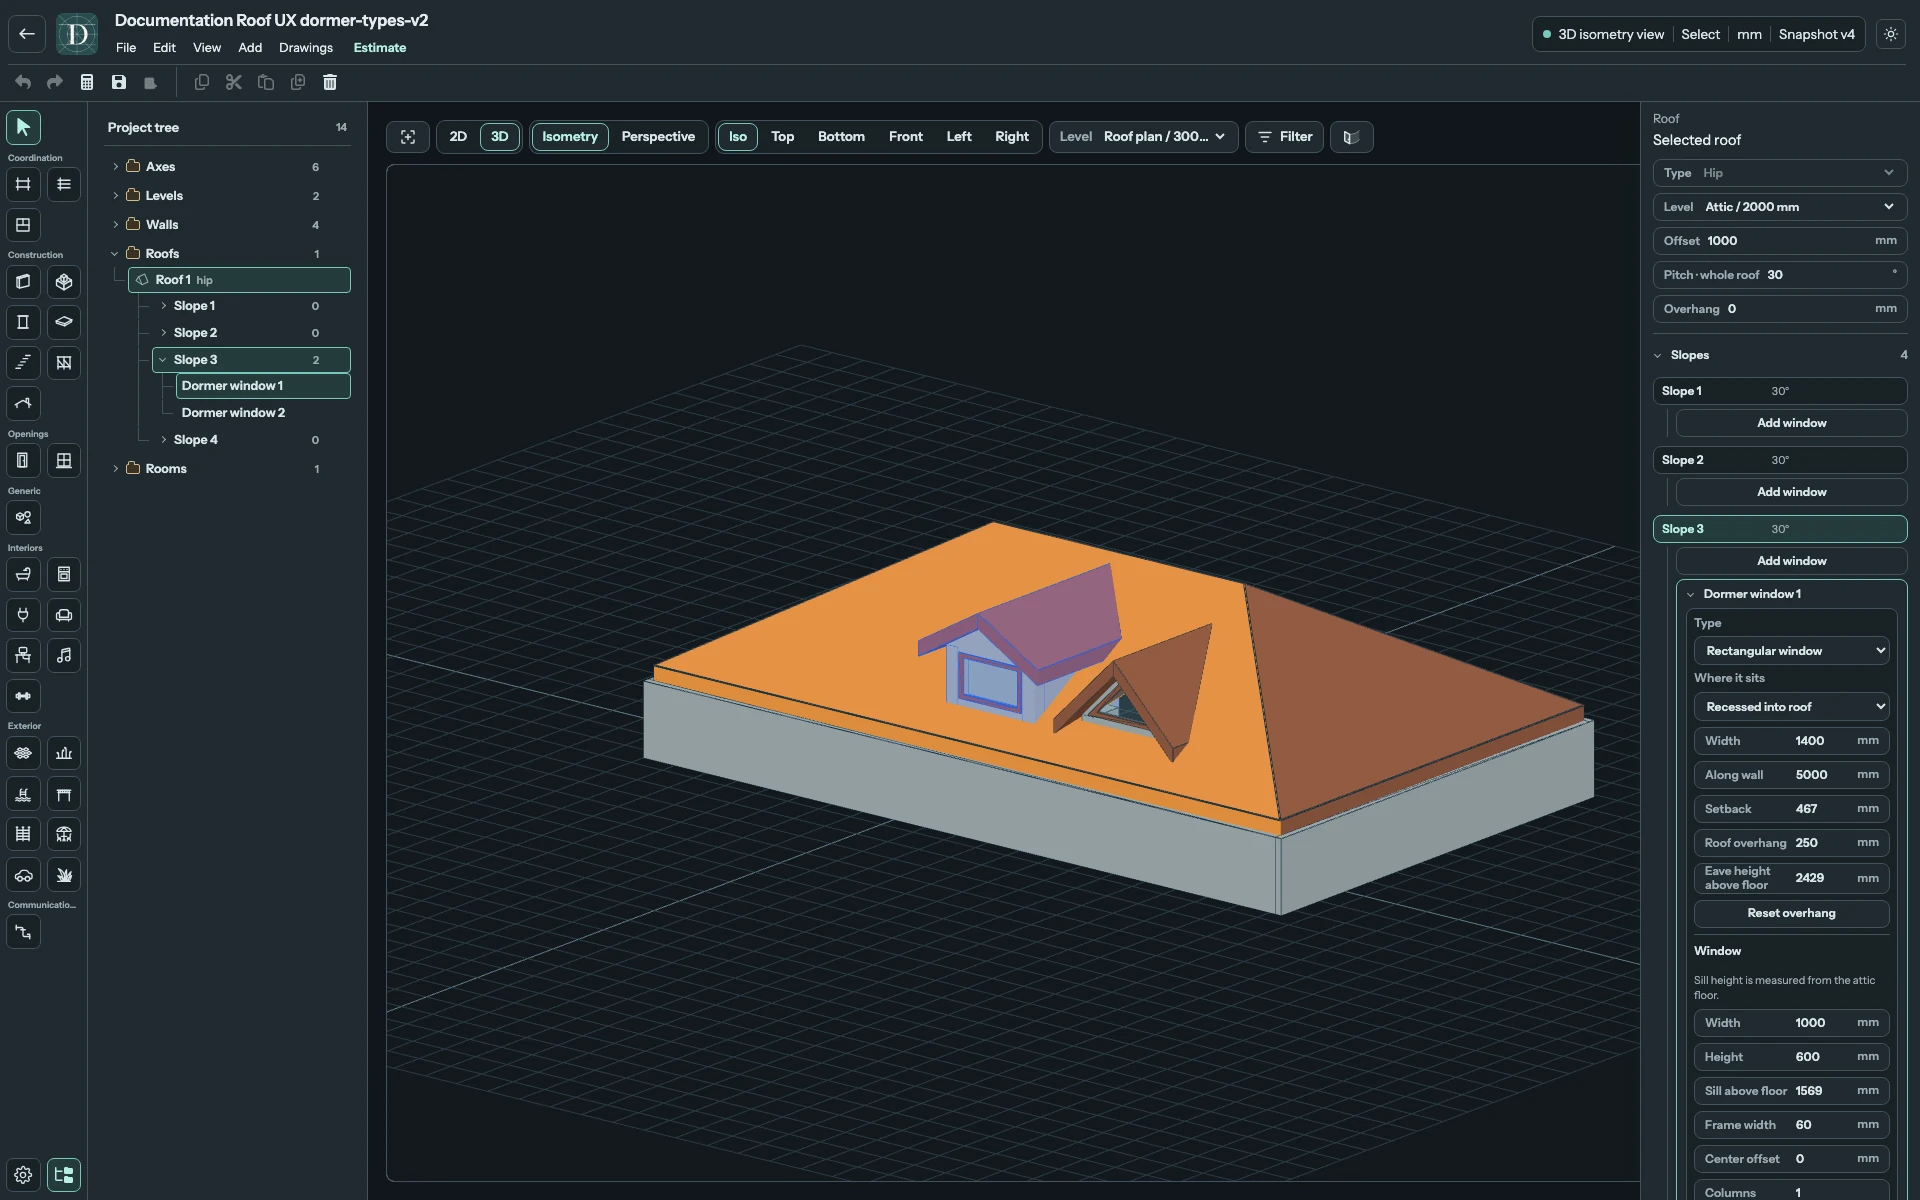
View the rectangular 3D example at full size.
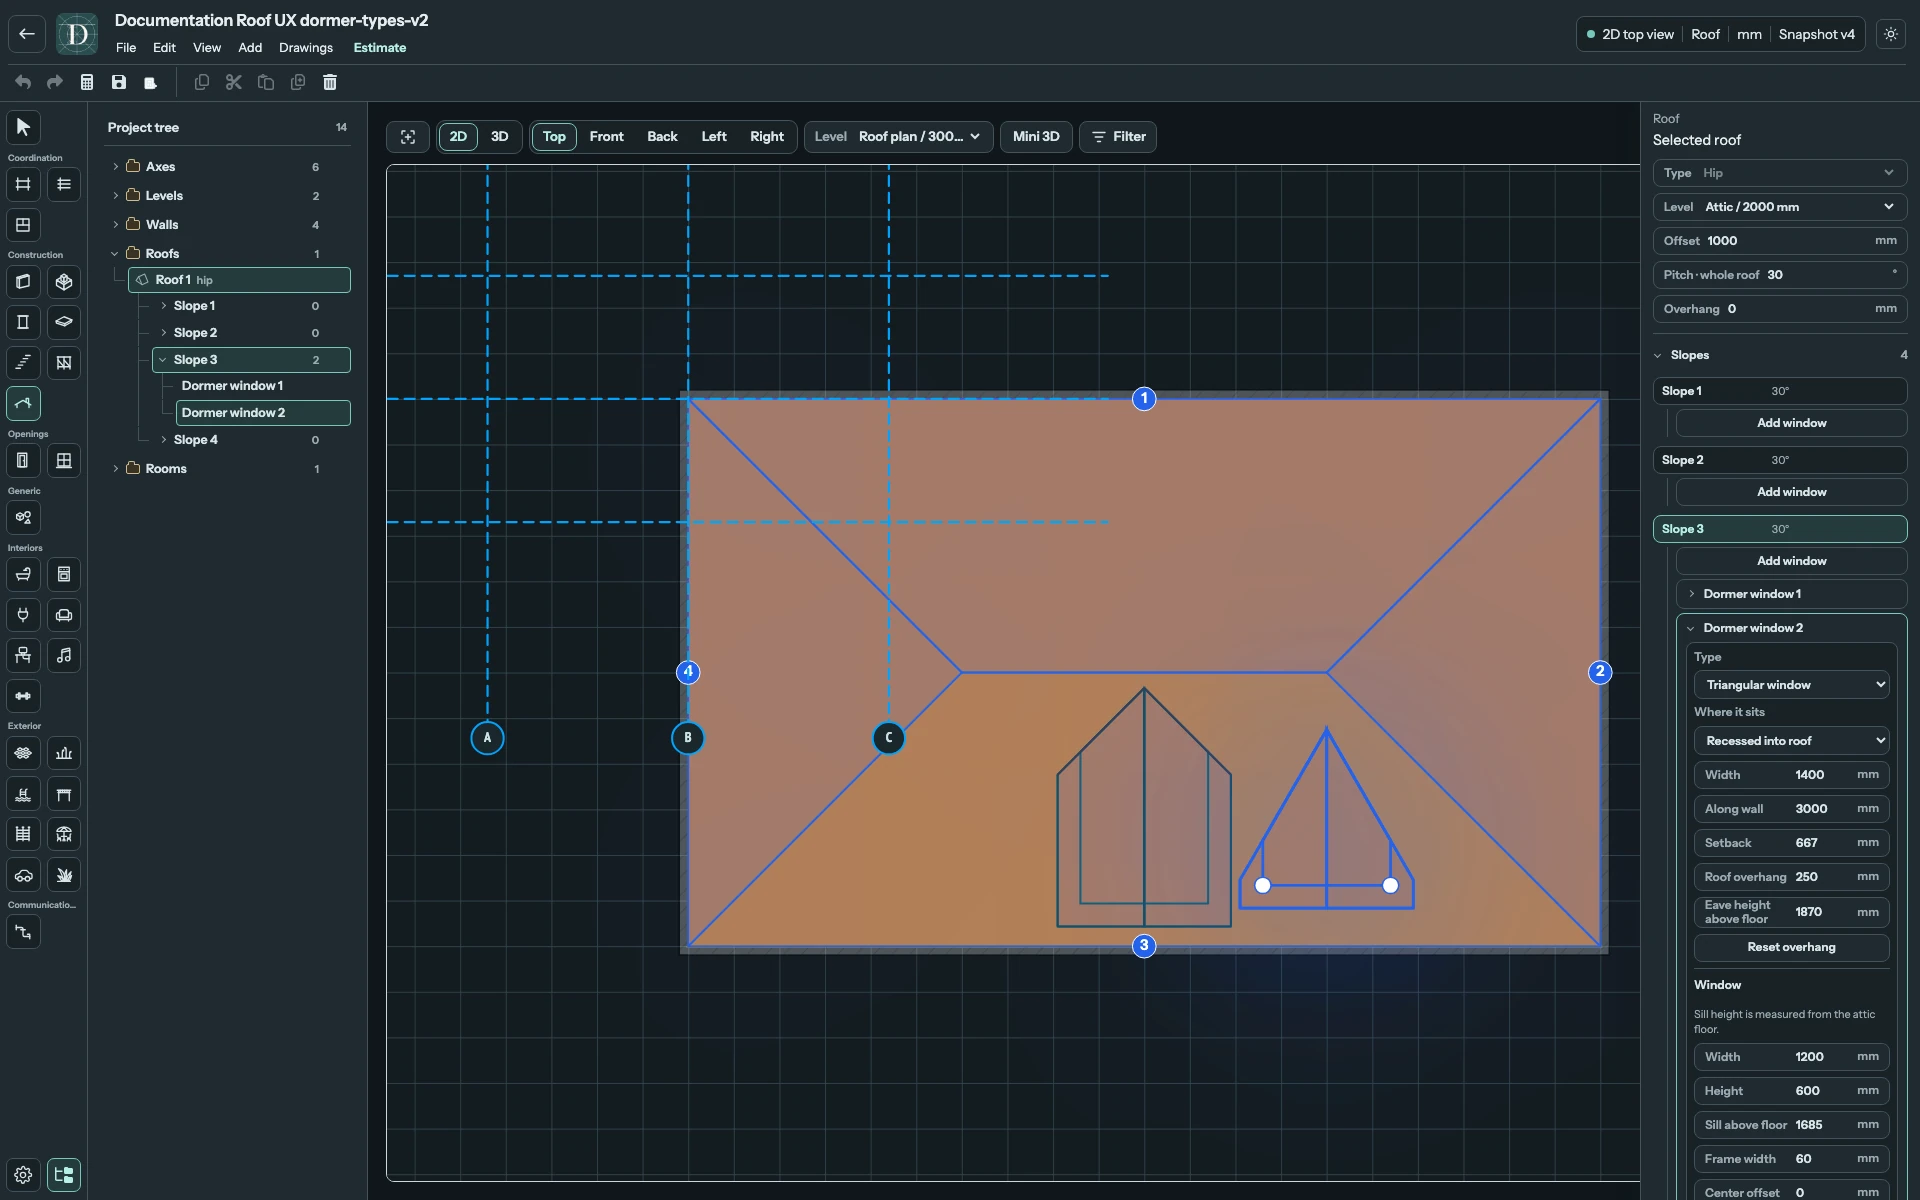
View the triangular Top example at full size.
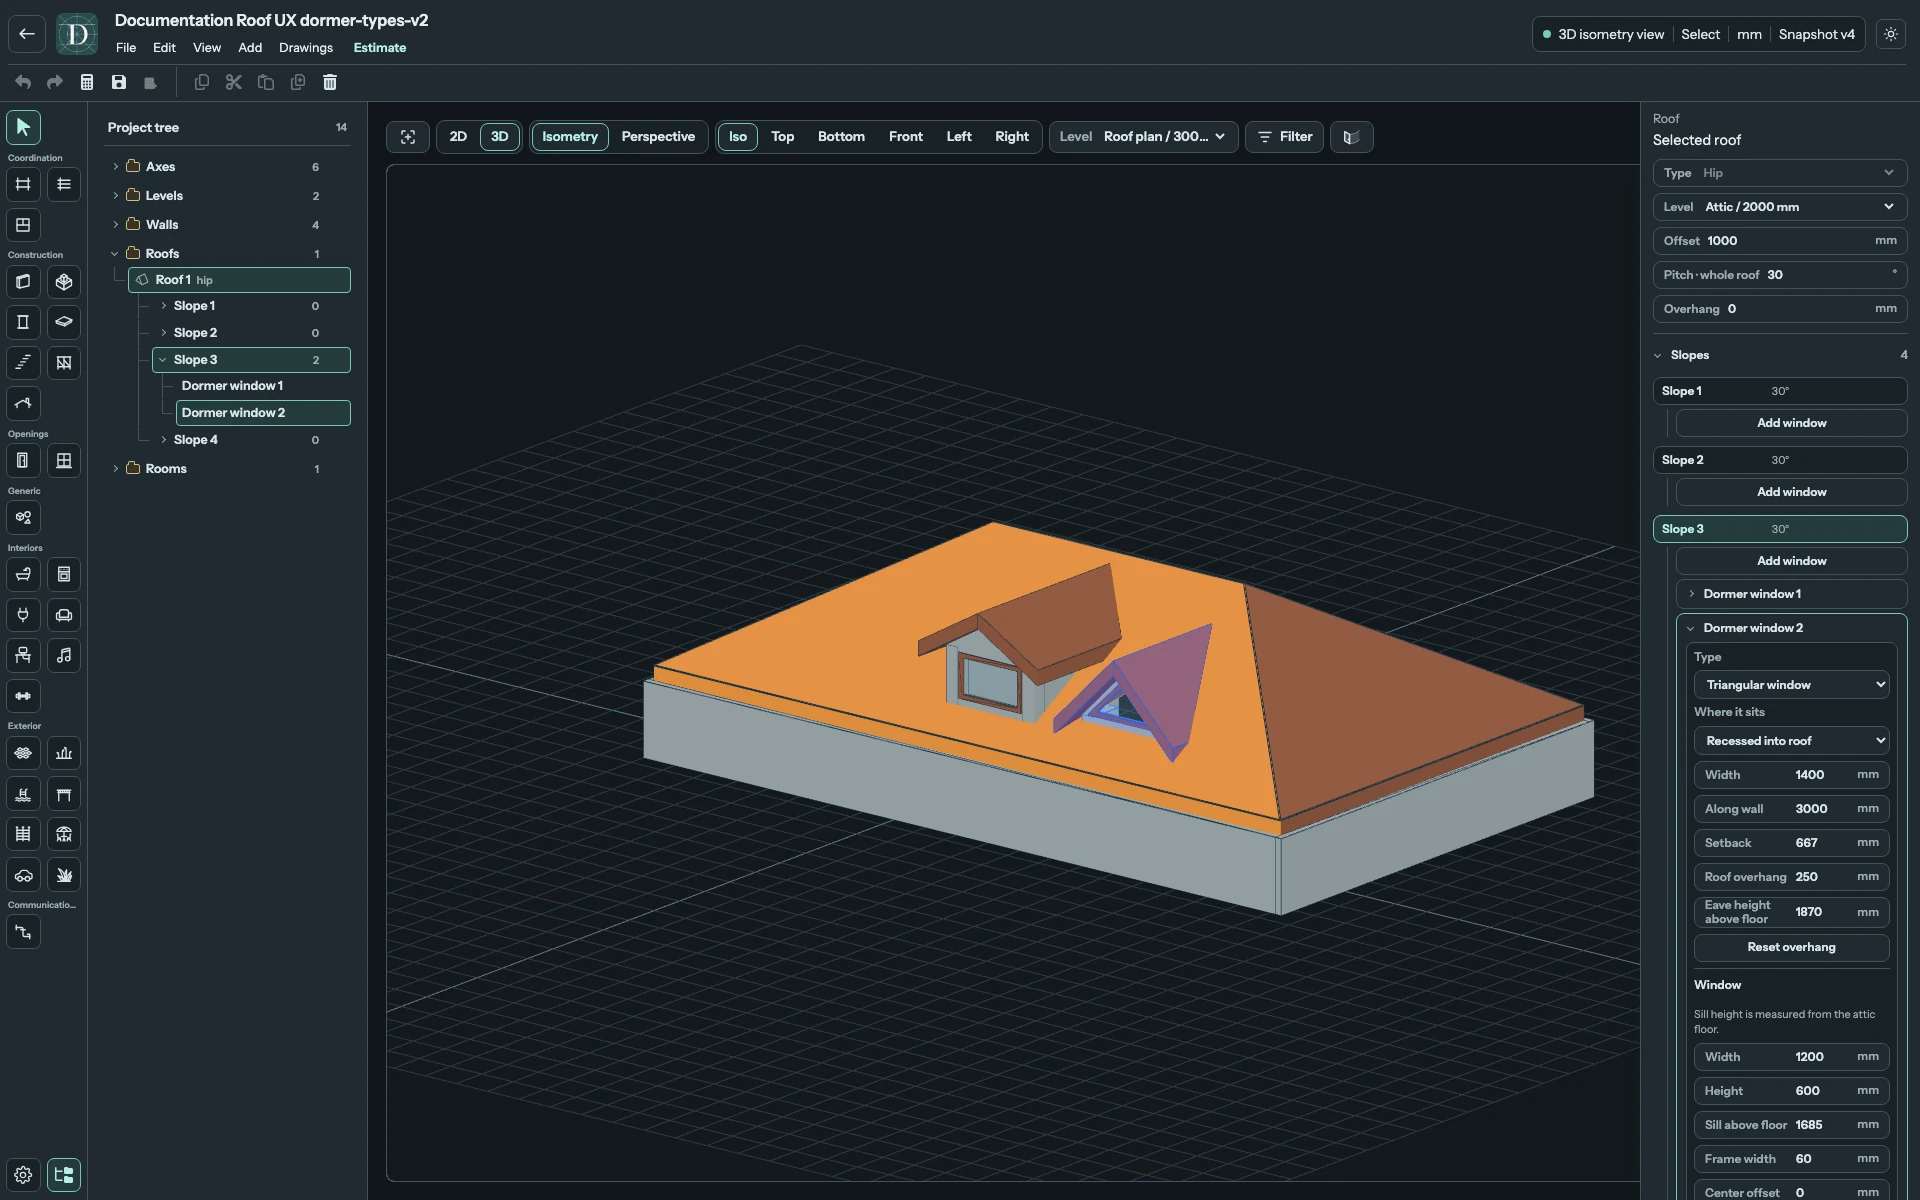
View the triangular 3D example at full size.
Position, body and small roof
| Control | Meaning |
|---|---|
| Where it sits | At exterior wall places the front at the supporting boundary. Recessed into roof allows a non-negative setback that fits the complete roof junction; Set back on slope keeps at least 300 mm inward. New recessed windows begin at a suitable inset, starting with a 100 mm placement margin. |
| Width | Positive overall dormer width along that boundary. |
| Along wall | Non-negative position along the supporting boundary, following its direction. |
| Setback | Inward distance from that boundary. Disabled for At exterior wall. |
| Eave height above floor | Small roof eave height measured from the Roof's bound attic Level. It must accommodate the window. |
| Roof overhang | Front and side projection of the small roof. The initial value is 250 mm; Reset overhang restores it. Allowed values are 0–500 mm, subject to fitting the slope. |
The small ridge stays horizontal and cannot rise above the main roof ridge. Equal ridge heights are allowed. The small roof, side junctions and opening in the main roof extend to their intersection. The editor never substitutes a detached rear wall for a missing junction.
Inspect the dormer from inside the attic as well. Its front and side walls meet the resolved interior support surfaces of the main and small roofs; the real window aperture remains open. The attic interior lining helps inspect this junction when the Room's analysis is enabled. Window sill height remains a separate distance above the attic floor.
A rejected width, height, sill or position leaves the previous valid geometry and Undo history intact. Reduce the dimensions or sill height when the small ridge would exceed the main ridge. Overhang values are modeling controls, not universal construction requirements.
Change the main roof overhang
After you change a main Roof edge's overhang, the editor rebuilds the dormer's opening, small roof, side junctions and framing against the new slope. An independent dormer may move down the slope to keep its window dimensions and sill height above the attic floor. Check its Setback and the connection in a side view or 3D.
The change is rejected if that height cannot fit without crossing the supporting boundary, another opening or the main ridge. A window fixed At exterior wall cannot move away from its supporting Wall automatically. Adjust its sill or the requested overhang when the editor explains this conflict. The previous valid model stays intact; one accepted edge edit can be reversed with Undo.
This separate Gable example uses a 45° main roof. Both windows retain their own pre-edit dimensions and sill height after all four edge overhangs change from 0 to 400 mm. Their settings differ from the Hip examples above.
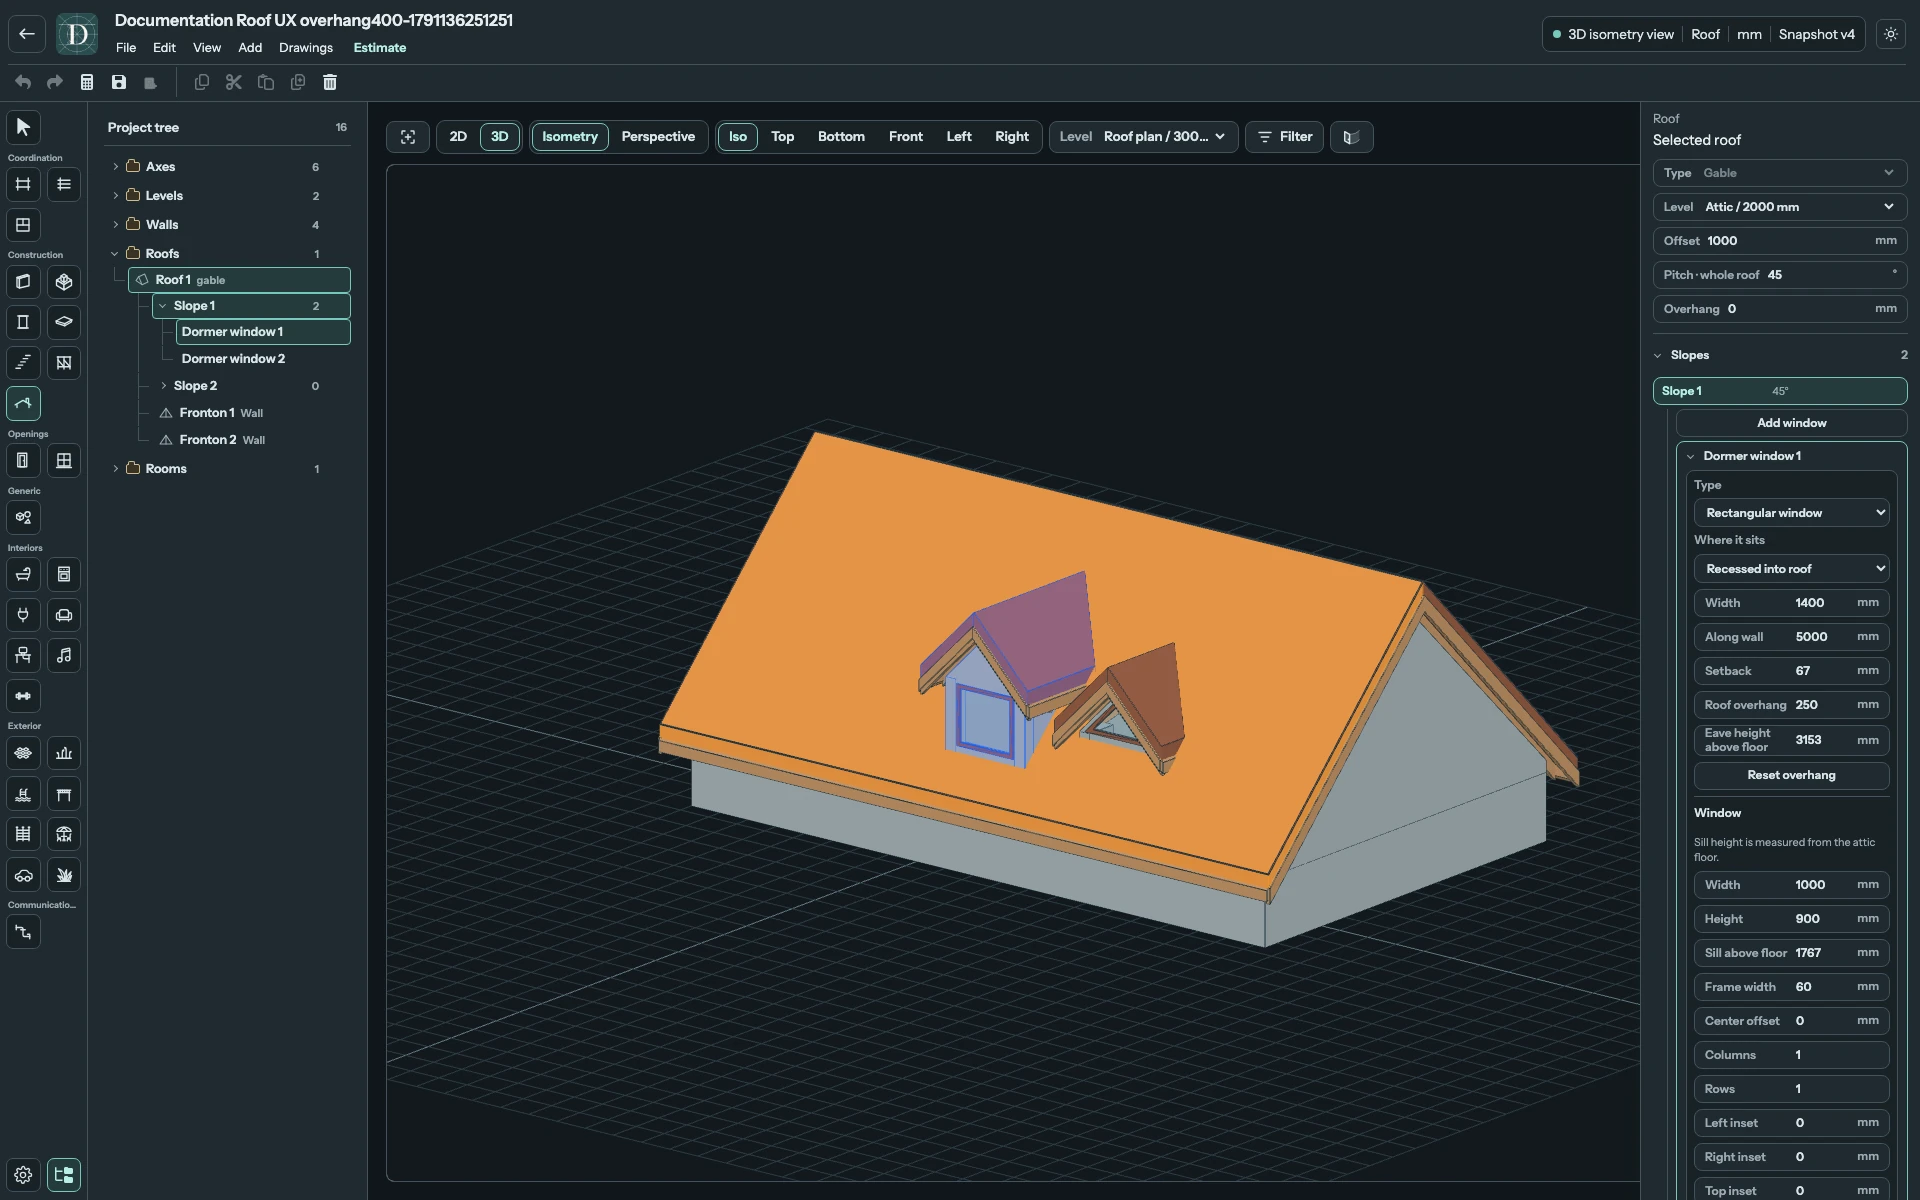
View the overhang example at full size.
Window, frame and glazing
The selected child's Window fields control its opening. Enter lengths in your displayed project unit.
| Control | Meaning |
|---|---|
| Width, Height | Opening dimensions. The initial rectangular height may be smaller on a shallow slope so the complete dormer fits. |
| Sill above floor | Bottom of the window measured from the attic Level floor, independent of the Roof's Offset. |
| Frame width | Width of the frame bordering the glazing. |
| Columns, Rows | Frame divisions across and up the opening, each an integer from 1 to 12. |
| Left inset, Right inset, Top inset, Bottom inset | Non-negative margins shaping the opening profile. They must leave a valid glazed opening. |
| Center offset | Signed sideways offset from the center of the dormer front, following its supporting boundary direction. The entire window must still fit within the body. |
| Glazing opacity | How opaque the glass appears, from 5% to 95%. |
Opening Width, Height and Frame width are positive. Sill above floor is non-negative, subject to the main-roof clearance and ridge limits.
The frame and glazing rebuild together. A frame that leaves no glazing, a window wider than its body, or dimensions that cannot fit the complete roof junction are rejected. The surrounding body can grow to accommodate a valid window, but it cannot exceed the main ridge.
For a recessed dormer, lowering Sill above floor can reduce Setback just enough to keep the actual window frame above the main roof. The window keeps its entered sill, dimensions and position along the supporting boundary. Its small roof, side walls and main-roof opening rebuild together. If the complete dormer cannot fit at that height, the field returns to its previous value with an explanation. A direct change of Setback or a mouse drag must itself fit; it does not trigger this sill adjustment.
Compare dimensions and floor height
This separate Gable study has an attic floor at 2000 mm, Roof Offset 1000 mm, main pitch 45° and Overhang 400 mm. Its rectangular opening starts at 1000 × 900 mm with Sill above floor about 2167 mm. These are example values; choose the opening size and floor height for your own project.
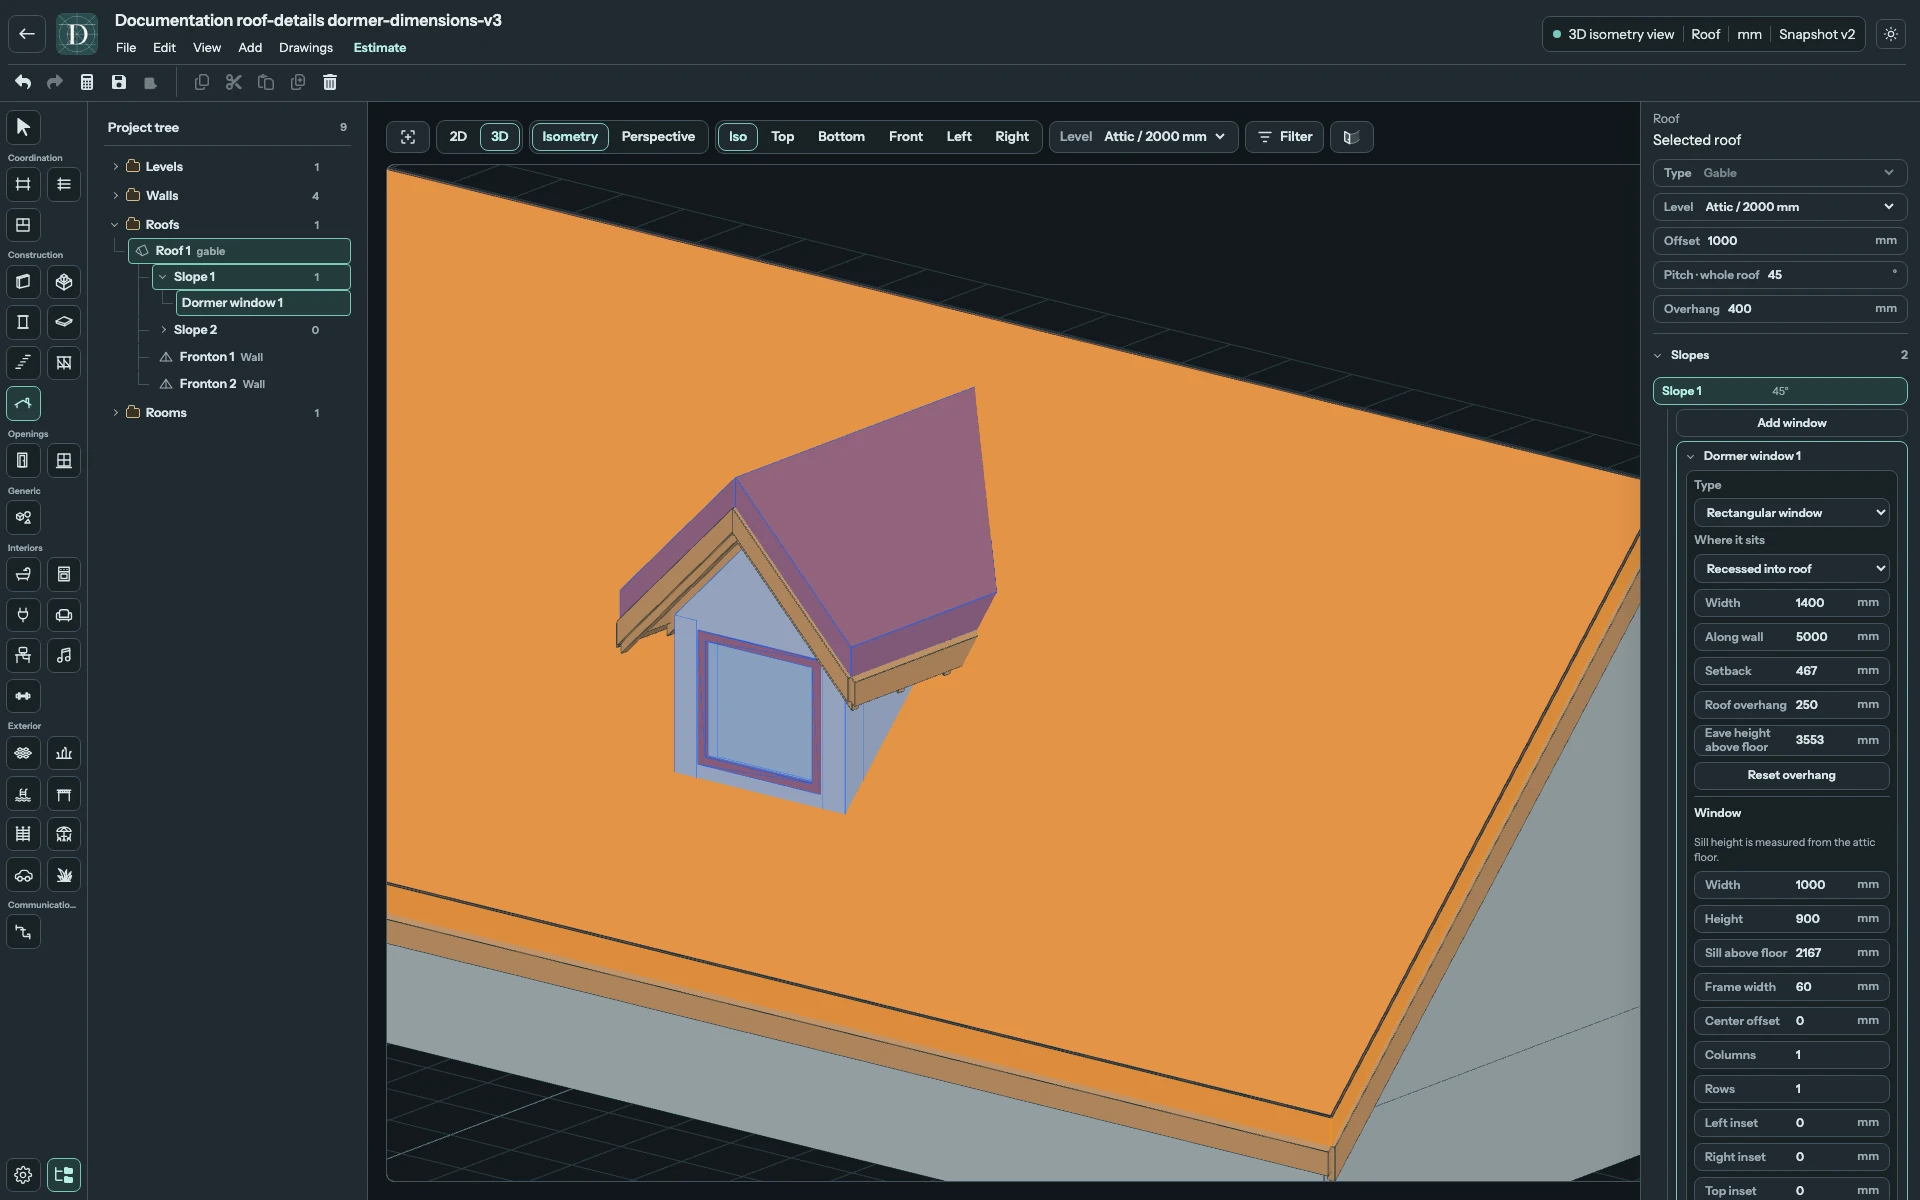
View the original opening at full size.
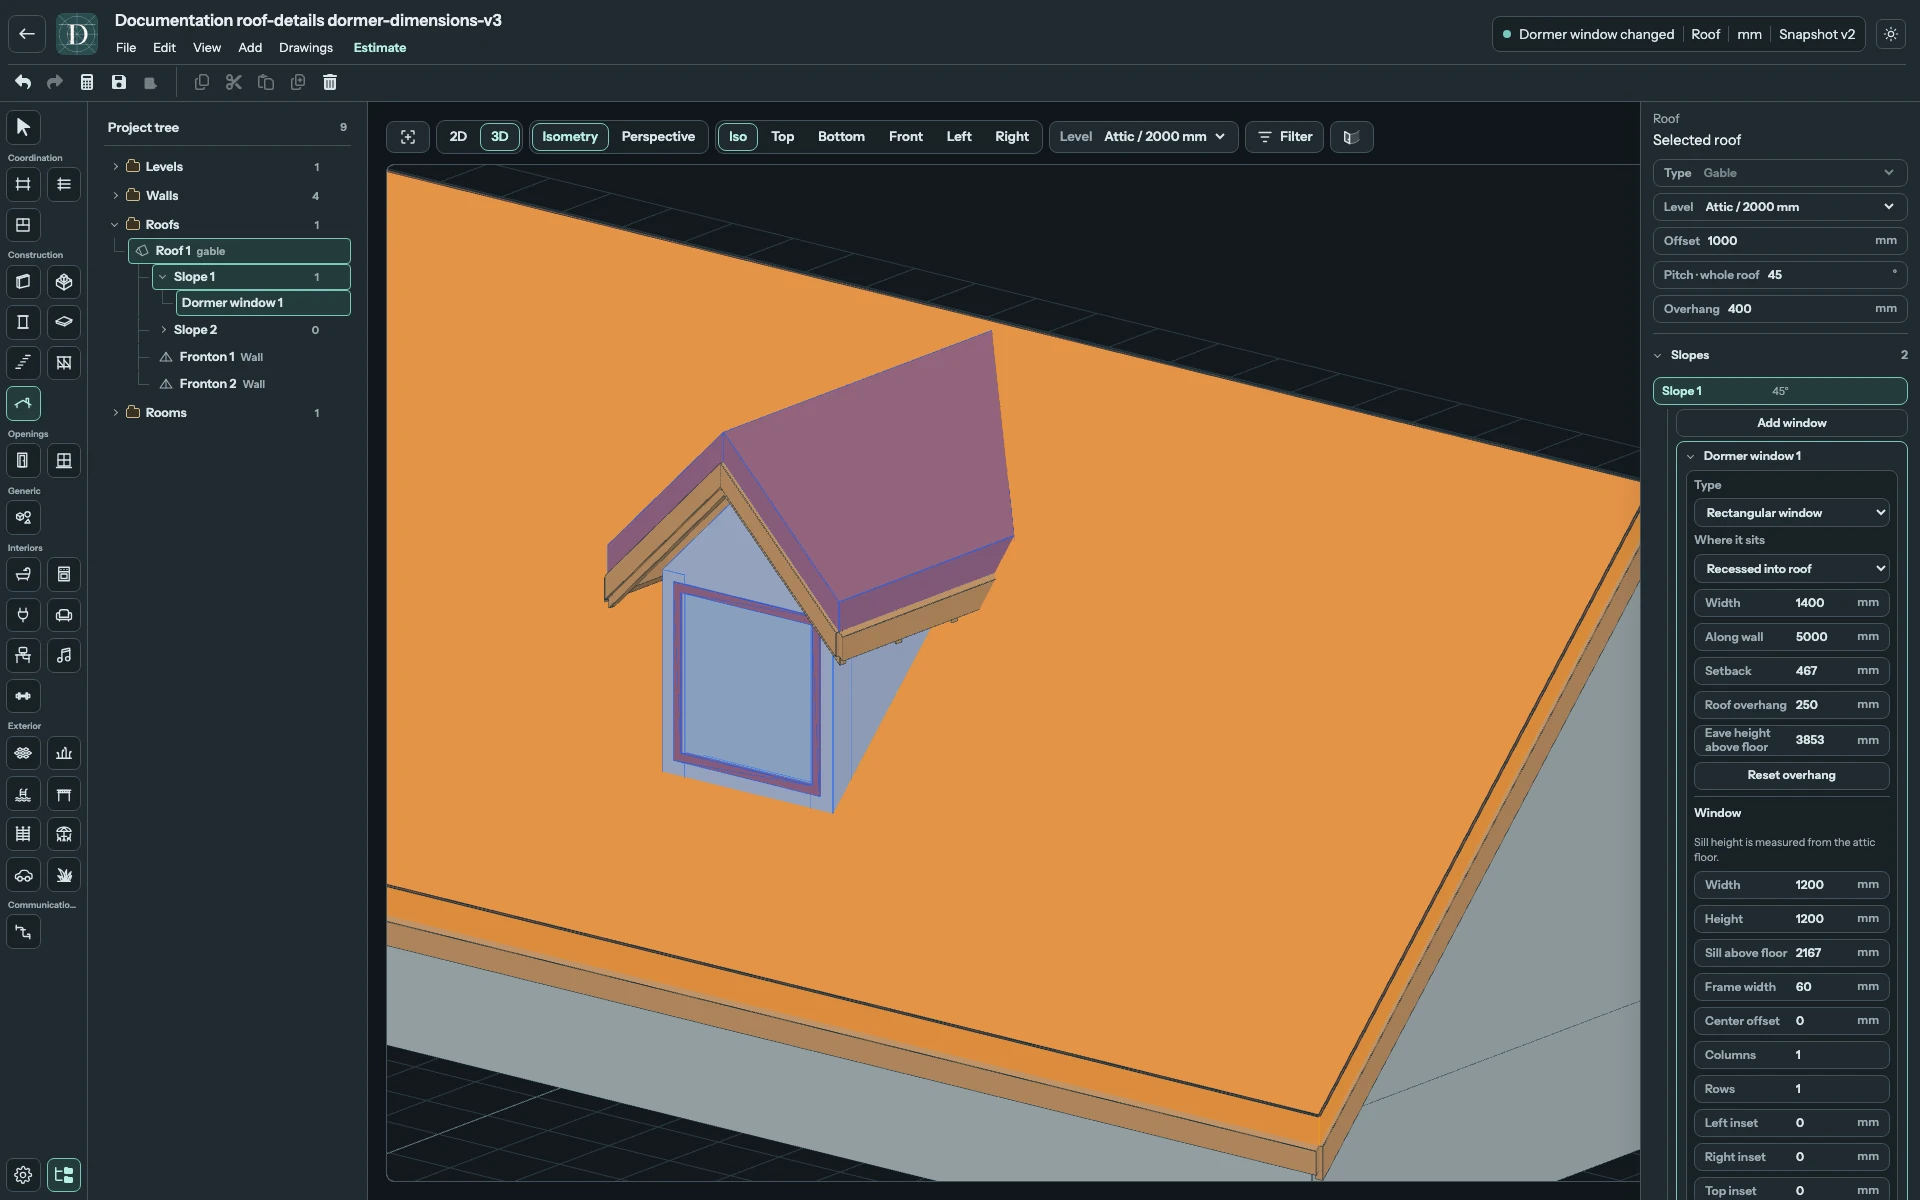
View the larger opening at full size.
Lowering Sill above floor to 1900 mm in this study changes Setback from about 467 to 300 mm. The 1200 × 1200 mm window stays clear of the main roof. A requested sill of 1100 mm cannot fit and is rejected. One Undo reverses the accepted sill edit and its automatic position change together.
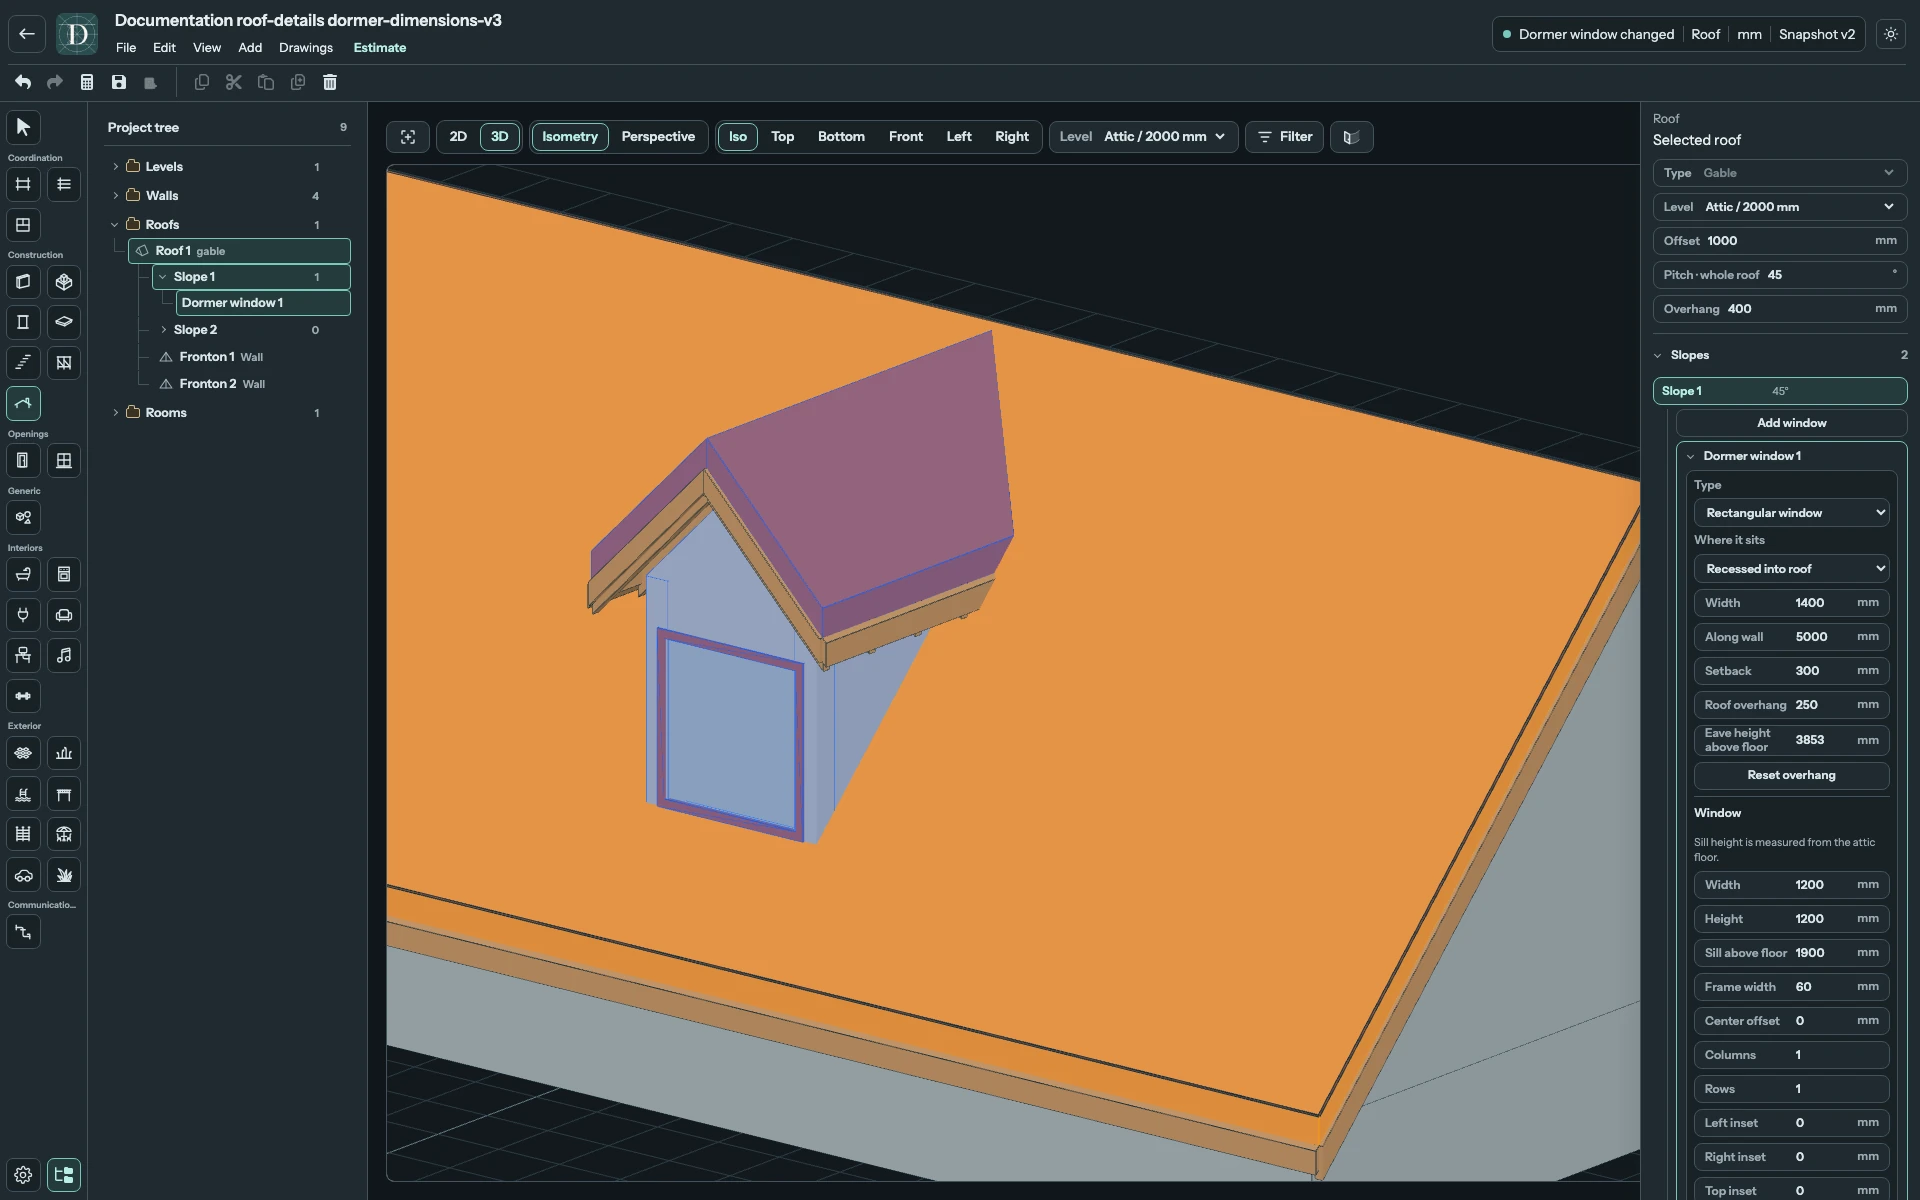
View the lower floor sill at full size.
Move, delete and save
Choose Select, then drag the dormer's outline in Top, its visible body or window in a side view, or its visible body in main 3D. Move left or right in Top or 3D when that direction is hidden in a side projection. The complete dormer stops at the first invalid position; its body and small roof cannot cross the host slope's edges or other openings.
In main 3D, a selected dormer also shows a central grip with left/right arrows when Show shell is on. Drag that grip to move only along the supporting boundary; it keeps the setback unchanged. Drag the body when you need both position directions. The Mini 3D preview displays the result but does not offer this editing grip.
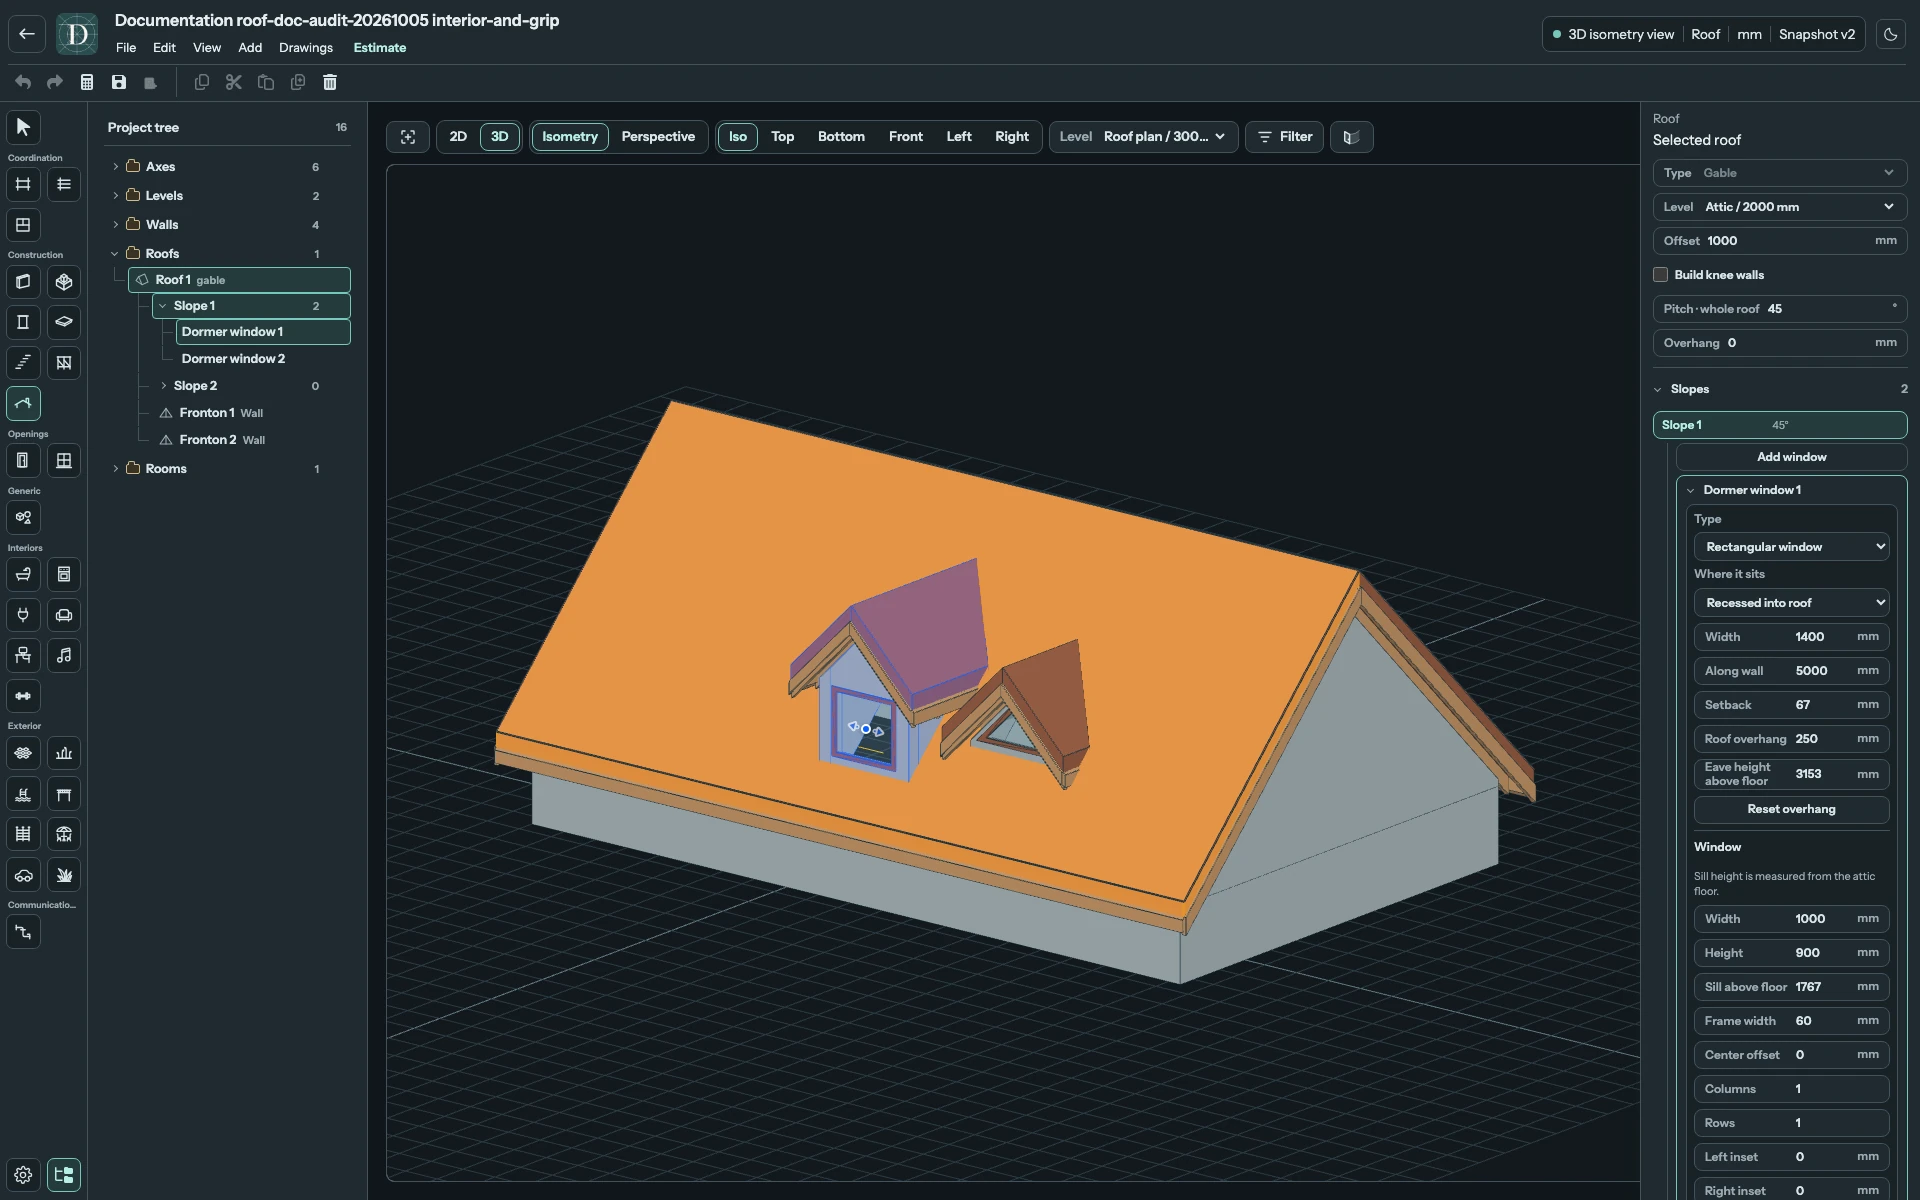
View the dormer movement grip at full size.
Movement keeps the window's height and sill height above the attic floor. The rear junction and main-roof opening rebuild at the new position. The Mini 3D preview follows these changes. Release the mouse for one Undo operation, or press Esc during the drag to cancel.
Use Delete dormer window inside the child or press Delete when it is selected. This removes that dormer and restores the main roof opening and framing. Undo restores it. Removing the whole Roof also removes its hosted windows. Save before leaving and reopen the project to check the retained settings.
Check the roof drawing
Save the model, open Drawings, select the Roof's Level and choose Sheet → Roof plan with View → Top. The small roof has a ridge, two eaves, front rake edges and two valley junctions. The vertical window appears as a frame footprint and glazing line. Rafter plan also shows the roof edges and window symbol; its members depend on the selected framing system.
See plan sheets, framing and PDF export for the related controls and output.